Browsing Category

Desserts Sweets

Sagu de Vinho #24

August 28, 2009

Most of the Brazilian recipes I Google pop-up on the first search page, but for Sagu I had to do a little more digging. I’m not sure if it has to do with the popularity of this dish, or that maybe it is more regional to the area we are living in. I say this because I happened to mention it to my host during my visit to Minas Gerais and she hadn’t heard of it before.

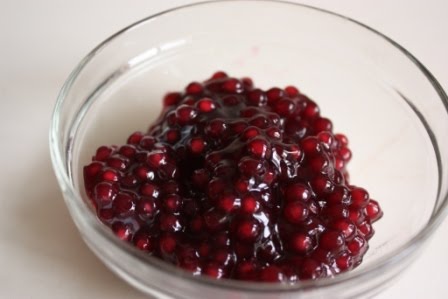
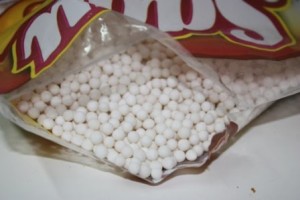
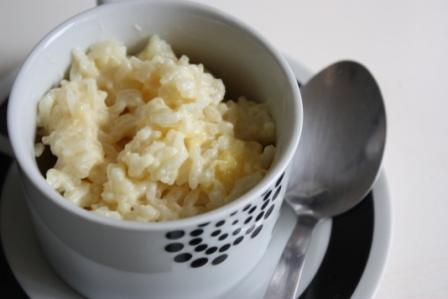
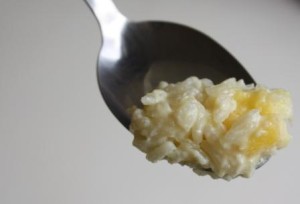
Sagu is basically tapioca pearls. It is served as a dessert around here and you can often find it among other sweets on per kilo buffets (which are the normal lunch for many Brazilians). Sagu can be made with only juice. However, I prefer the version made with juice and wine.

My husband’s coworkers have joked before that they loved it as kids when their grandmothers made Sagu because it meant they got to have a little wine. Although, considering the cooking process, I doubt there is much alcohol left in the final dish.

Sagu reminds me a lot of a jello salad (without all the artificial ingredients). The pearls become slightly chewy and the cooking process turns the liquid into a thick sweet sauce that has an intense tangy flavor from the concentrated wine. It’s good at room temperature or cold, but after it gets cold the pearls and sauce really solidify so it does become thicker and a bit sticky.

Since having Sagu out at restaurants I wanted to try it myself at home which is why I made it #24 on my 30 Foods List. Like most culturally specific foods there are different recipes for making it. Some cook the sagu in water before adding the wine or juice, others also include cinnamon and clove for flavoring. Me, well, I just followed the recipe on the back of the bag of tapioca pearls.


I think we’ve established that desserts in Brazil are sweet, really sweet. So it’s no surprise that in addition to a liter of juice the recipe calls for 2 cups of sugar! You’ll be happy to know that I left that out. I used ½ juice and ½ table wine, and knowing the juice had some sugar in it to begin with I knew it would be sweet enough for me and it was.

I think you should be able to get your hands on tapioca pearls in the States pretty easily so if you are looking for something a little different for dessert, give Sagu de Vinho a try.

Sagu de Vinho

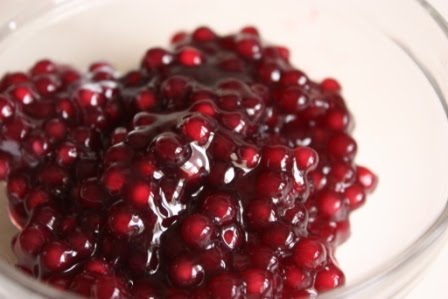
1 cup tapioca pearls
½ liter grape juice
½ liter red table wine

Add all ingredients into a medium to large soup pot. Cook over low heat until the pearls become transparent and are cooked through, about 30 to 45 minutes.

A note to San Francisco readers and those headed to the Foodbuzz Fest:

I’m headed to the event and will be in the area for an extended period. If you want to meet up at some point to talk food, health and culture let me know!

Because I kind of like corn…

August 7, 2009

Corn has a pretty bad reputation if you think about it. All those bright green stalks that symbolize summers of my childhood; those crisp, sweet kernels from a just-picked ear. Their beauty has been tarnished because of all the not-so-great things that corn is turned into. You know the syrups and starches, the vast overabundance of it in the food supply, not to mention it being on the don’t-eat list for those once popular low-carb diets. Oh, poor corn.

The truth is when it comes to fresh corn and more natural things made of corn, I like the stuff. Corn is very popular where we are in the Brazil. When we have visited the coast, you can find people selling it on the beach, there are restaurants in town completely devoted to items made of corn, it is a common pizza topping and then there’s fubá.

It took me a while to figure out the exact origin or makeup of fubá . By the way it is pronounced fu-BAH, with a big emphasis on the BAH. Most sources equate it to cornmeal in the U.S.; however it is a very fine cornmeal. It is used as a flour here and can be found in the form of cakes (bolo de fubá), cookies (biscoitos de fubá) and, according to a recipe on the package, even soufflé.

I wanted to try making some things with fubá so over the past couple weeks I gave the cake and the cookies a try. I also should mention that I didn’t do any playing around with different (i.e., less processed) ingredients because I really want to try the original first.

The cake was once given to us as a gift and I’ve had it at parties, so I was able to compare what I ended up with. I baked it in a loaf pan instead of a Bundt or sheet cake pan and I really liked it like this. I could enjoy it as more of a bread. It is similar to a sweet cornbread, although not as course and the butter makes it incredibly rich. It is one of those cakes that can very tempting for breakfast with some coffee.

Bolo de Fubá

200 grams butter, softened
1 cup sugar
2 eggs
1 cup fubá
½ cup all purpose white flour
½ cup milk
1 tsp baking powder
2-3 Tbsp finely ground, unsweetened coconut

Preheat oven to 350 degrees F. Grease and flour a standard Bundt pan, large loaf pan or square cake pan. Cream together the butter and sugar. Beat in the eggs and mix well. Add the fubá, flour, milk and baking powder, mix well. Stir in coconut.
Pour batter into prepared pan and bake for 30 to 40 minutes until golden brown and baked through. Let cool and de-pan.
Cookies made with fubá have quickly become one of my favorites here. The first time I had one we took a chance at a bakery and ordered it by looks alone before I knew of the flour and I was intrigued. It is a slightly sweet cookie, and rather dry, but this is actually a good quality that makes it unique. This cookie stands out because it contains erva doce which is anise, so it has that very slight liquorice flavor. I’m not a huge fan of anise, but I find I enjoy it when it is subtle as with these cookies or pitzels.

When searching for recipes on the web, I found a ton, all with something a little different. So I decided to take the easy route and go with the simplest one. They are not exactly like the ones we’ve had at the bakery regarding texture, as shown in the picture above, but the flavor was just as tasty.

Biscoitos de Fubá
Adapted from Tudo Gostoso

1 ½ cups Fubá
½ cup all-purpose flour
½ cup sugar
2 egg yolks
½ Tbsp anise seeds
½ cup butter, melted
¼ cup milk

Preheat the oven to 350 F. Stir the fubá, flour, sugar and anise seeds in a mixing bowl. Add the egg yolks and butter and mix well until the dough is dry and crumbly. Add enough milk to make the dough stick together so that you can form a ball. This was about ¼ cup for me.

Roll the dough into balls about the size of a golf ball. Place them on an ungreased cookie sheet, 12 per standard sheet pan. The original recipe includes the step of rolling them in cornmeal first, but I didn’t do this. Flatten the cookies by hand or with a glass. Bake for 10 to 12 minutes until the sides and bottoms are lightly browned. Remove from cookie sheet and cool on a wire rack. Makes about 18 cookies.

So I’m wondering – have any of you who frequent ethnic/cultural markets come across something similar to Fubá? I’m interested if I can find a similar product when I’m back in the U.S.

Also, for a great variation of Bolo de Fubá check out 5 Star Foodie (winner of the Mango Challenge and box of Brazil goodies ).

Clean Pantry Creates Great Desserts – Peach Walnut Galette

August 3, 2009

With two months to go in our apartment, this weekend I started the process of a pantry purge. I’ve been taking stock of what is in my cabinets and, in all honesty, discovering a few things I completely forgot about. For example, my search brought me to a huge can of peaches which we received as a gift back in December.

At this point I’m sure you are wondering why we would receive canned peaches as a gift. What? You don’t give and receive canned foods in heavy syrup? Just kidding. Every Christmas the company my husband works for (the branch here in Brazil) gives holiday boxes to employees. These huge boxes are filled with all kinds of goodies and really serve two purposes. First they often contain holiday foods such as panettone, wine and nuts. Second, they also tend to have shelf stable, commodity-like goods for those on limited funds; things like pickles, lentils, prunes and…canned peaches.

While I’m not one to buy those peaches in all that thick syrup I did want to use them up. Like most foodies these days I turned to Twitter to seek out a good recipe for them. Maria from Two Peas and Their Pod caught my attention with a Peach Galette she made several months ago. Considering I just made bread last week, I was looking for some type of pie-like creation so this fit with my vision perfectly. In addition, I had never made a Galette before so it was a new challenge.

I substituted a few of the ingredients I had on hand. For example I used mascavo sugar instead of white sugar, and I used whole wheat flour and just a little white flour for the crust. In place of the corn meal I used fubá flour which is a corn flour here, yet much finer than corn meal. (I’m planning to post more about fubá in the next week or so.) I drained the peaches and rinsed them well to get the syrup off. Since they were canned I also used very little sugar. I added walnuts for a little crunch.

I was so happy with the results and my husband was a big fan as well! I will definitely be making this again and next time I will be using fresh peaches!
Peach Walnut Galette

Adapted from Cooking Light and Two Peas And Their Pod

Crust:
1 cup whole wheat flour
3/4 cup all-purpose flour
1/3 cup mascavo sugar
1/4 cup fubá flour (corn meal or corn flour works as well)
1/4 teaspoon salt
1/2 cup cold butter, cut into small pieces
1/3 cup whole milk

Filling:
4 cups diced peaches
¼ cup chopped walnuts
¼ cup mascavo sugar
1 tsp ground cinnamon
½ tsp pure vanilla extract
3 tbsp cornstarch

1 egg white
1 tbsp fat-free milk
1 tbsp mascavo sugar

Feel free to use a food processor for the dough. I don’t have one so I mixed the ingredients with a hand dough mixer. Combine the flours, sugar and salt. Cut in the butter and mix/process until it is evenly distributed about the size of peas. Pour in the milk and mix until a cohesive dough is formed. Shape into a ball, wrap in plastic wrap and refrigerate for at least 45 minutes.

Meanwhile pre-heat the oven to 375 degrees F. In a large bowl mix the peaches, nuts, sugar, cinnamon vanilla and cornstarch. Stir to mix well ensuring the peaches are well coated with sugar and cornstarch. In a separate small bowl whisk together the egg white and milk.

Remove the dough from the fridge and roll out into a circle about 14 to 15 inches wide. You can bake the galette on parchment paper. I baked mine on a pizza pan covered in foil because that is all I had. It worked fine. Once the dough has been transferred to your baking pan, pour the peach mixture in the center leaving a border of dough around the outside at least two inches wide.

Gently fold the edges of the dough over to the filling ensuring it all comes out shaped like a circle. Brush the crust with the egg white and milk and then sprinkle the galette with mascavo sugar. Bake for 50 to 60 minutes. The crust should be browned and the filling bubbling slightly. Remove from the oven and cool the galette (still on the baking pan) on a wire rack. Let rest at least 20 minutes before cutting. Enjoy!

***********************************

I also need to extend some thank yous today for an award I recently received. The One Lovely Blog Award came from Alison at Live Listen Cook and Rebecca from Chow and Chatter, two blogs I really enjoy reading. Alison shares a lot about her workouts, eating and daily health practices while throwing in some great recipes and product reviews. Rebecca is a RD who offers great cultural recipes and healthy nutrition news and advice.
Thanks for the awards! I read a lot of great blogs, but for this award I’ll narrow it down to three.

Taking on the 30 Foods List: Single Serve Sweet Rice

July 30, 2009
If you will remember I have this ongoing list of foods I intended to make to celebrate my 30th year, the 30 Foods List. So far I’ve completed about seven, although I haven’t posted about them all, and guess what? Tomorrow is the last day of July! It seems maybe I was a bit ambitious considering that some of the foods I chose may require ingredients that I can’t get here in Brazil. I am still hopeful, but I am giving myself a little leeway and re-setting my goal to make all the foods by the end of 09.
One of the foods on the list is sweet rice, a very popular dessert here in a Brazil and in many other cultures as well. I made canjica a while back, a sweet rice-like dessert made with hominy, but I didn’t think this truly counted. Considering the sweet rice is a bit basic, I decided I need to make it original somehow.
The other day my lunch was screaming for something sweet to seal the deal and I had about a ½ cup of leftover rice in the fridge. I decided to turn that, along with a Palmer mango, into a single serving of sweet rice for dessert.
Really easy, wonderfully tasty and it meets a 30 Food List goal. That’s all the motivation I need so here you go.
Single Serve Sweet Rice with Mango
½ cup cooked long grain rice
2 T sweetened condensed milk
2T coconut milk
3T whole milk
¼ cup chopped mango
In a small sauce pan combine the rice and all three milks. Cook on medium high heat until the mixture becomes bubbly and thick, about 10 to 15 minutes. Stir in the mango and heat through. Enjoy!
Here are a few other things I’ve already made on my 30 Foods List:
Beijinhos (also see the guest post at 5 Star Foodie)
Brigadeiro
Croissants

Irish Fruit Scones

Tangerine Cake and Travel News!

June 29, 2009

I wasn’t around much at all this weekend and I even missed a links post. However, I return to you bearing dessert and some great news!

First things first, let’s talk dessert. A couple weekends ago I had a craving for a good pound cake, something with a bit of a citrus flavor. I had purchased a whole bag of tangerines at the farmer’s market planning to juice them. However, I haven’t been in the mood for cold juice.

Turns out, cake was their destiny.
I found this recipe for Tangerine Pound Cake from Betty Crocker. It produced a dense cake full of tangerine flavor. The glaze sealed the deal, made of tangerine juice and rum. It is a recipe I will definitely make again and plan to experiment with. I’m thinking lime will be next.

As many of you know, our two years (actually a little over that) in Brazil will soon be coming to an end in October. Since we made the decision to move here, we’ve had on our minds the idea of a long trip to close out the end of this adventure.

South America was the logical choice, but unfortunately the cost of traveling here is expensive. Not so much once you get to a place, but the act of getting there, as in the flight costs. We had big plans to see a lot of Brazil and South America while here.

Boy, were we wrong. Going to other countries from the small town we live in costs about the same as going there from the U.S. There are still a couple places we want to visit and we hope we stumble upon some fare sales, but as far as an around SA trip, well, it became much less appealing. Considering we want to see pretty much every country in this world, however, we were not left without options.

Europe came to mind because we still have so much to see there, but we have been there the past few years. I was actually planning to go back to Ireland with my husband while he worked this year and then both of us go on to Italy this year, but once again, plans changed.

Hmmm…so where else could we go? Maybe an area overflowing with foods made of coconut milk, curries, noodles and seafood where street food and food courts are the place to be. Places with lots of culture, beautiful beaches and some unbelievably inexpensive travel prices.

Yeah, that sounds good.

Ready? We’re going to Southeast Asia and I can hardly stand the excitement!

The month of October, before we settle back into the US and all the reverse culture shock that is sure to go with it, we will be traveling to – Hong Kong, Bangkok-Thailand, Chiang Mai-Thailand, Krabi-Thailand, Singapore, Kuala Lumpur-Malaysia and Bali-Indonesia.

Oh and don’t worry, you are going with me. The blog will, of course, turn into more of a food travel blog for that month, but I plan to share my food adventures with you as much as possible. In fact, I’ll be spending my 31st birthday at a Thai cooking class complete with a trip to the market!

To top off this already fantastic news our flight just happens to come back into San Francisco a few days before the big Foodbuzz event which I am anxiously awaiting details for. I’m planning to stay on a bit longer and attend. If you are going, let me know!

Have you been to the places we’re planning to go? I’ll gladly take any advice you want to share.

Coconut and Lime Wheat Scones

June 18, 2009

I think my love of scones has been pretty well established. I just can’t get enough of them. A donut? Eh, maybe. A bagel? Well, okay. Scones? Yes! Bring them on over. It is with these treats that I love to do my breakfast splurging.

I’ve had the coconut and lime combo on my mind lately so I decided I would give it a shot with scones. I found a few recipes online, but not quite what I was looking for. I knew I wanted to utilize the zest of the lime as well as the juice and I really wanted to use some coconut milk. On top of that I did have health on my mind, wanting to play around with a whole wheat version.
Well, this is what I got. I have to say that I taken aback a bit by my husband’s raving praises. He often thinks my food is good, but raving about how good is a new step for him. Maybe I am on to something.
Coconut and Lime Wheat Scones
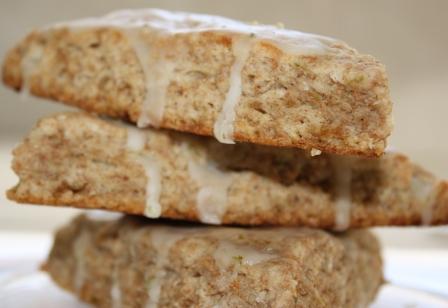
1 ¾ cup whole wheat flour
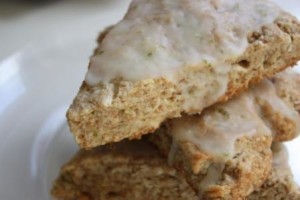
2 ¼ tsp baking powder
2 tbsp mascavo sugar (unrefined cane sugar)
½ tsp salt
1 tbsp lime zest (about half from one lime)
¼ cup finely ground unsweetened coconut
¼ cup unsalted butter, cold
1/3 cup coconut milk
¼ to ½ cup milk or heavy cream
¾ cup powdered sugar
Juice of one lime
1 Tbsp lime zest
In a mixing bowl combine the flour, baking powder, sugar, salt, zest and coconut. Add the butter in small pieces. Blend with two knives or a pastry gadget until the pieces of butter are about the size of peas and evenly distributed. Add the coconut milk and combine. It will likely be dry.
Add enough milk or cream so that the dough comes to a manageable consistency, a bit drier than a bread dough, but to a point where it can be kneaded.
Turn the dough out onto a floured countertop. Knead gently to bring the dough together and shape it into a circle about ¼ to ½ inch thick. Cut into eight pieces.
Bake on a lightly greased sheet pan at 400 degrees F for 15 minutes or until the edges are slightly browned. Remove and allow to cool on a rack.


Add ½ cup powdered sugar to a small bowl. Add the juice of one lime and whisk until smooth. Whisk in the lime zest and enough of the remaining powdered sugar to reach desired consistency. It should be slightly thick, but still thin enough to drizzle and glaze.

Pour glaze over each scone and allow it to harden. Enjoy!

***If you prefer not to use powdered sugar and want to omit the glaze I would suggest adding some more sugar to the scone dough as it is not very sweet at all. The glaze is really what brings the sweet, salty, sour flavors together.

Will Learn for Food

June 15, 2009

As most of you know I just finished reading Food Politics by Marion Nestle not too long ago. While it took me a while to get through the book, I enjoyed it thoroughly and I learned a lot. One specific section that has stuck in my mind was that which addressed food brands and companies in schools.

Aside from my growing issues with the influence food companies have on our children and their health, this topic brought up some things from my time in elementary school – food related incentives.
Candy was a big deal in third grade. We were asked to learn things like our spelling words or memorize bits of info in exchange for taffy or a candy bar. Even as a kid that age, who struggled with weight ( as in a little on the chubby side), I often told the teacher I didn’t want to participate. Then, I blamed it on not wanting the candy, which they thought was weird, but I think it may have been more that I didn’t want to do the homework!
Despite these little candy rewards here and there, looking back I don’t feel that this was quite as powerful as the influence of food brands. According to the book these are growing beyond belief. Isolated schools are making changes, but it still remains a powerful force when it comes to lunches and rewards.
I was a big reader in grade school, I still am. But at that time in my life all my reading paid off in the form of individual pizzas from a popular pizza chain. I loved that program. I would read and read all summer in order to get my pizza.
Then, it all seemed so innocent. My parents didn’t view it as a big deal either. I mean, hey, I was reading and increasing my knowledge and all foods in moderation, right? I try not to overreact to these types of things now days, but it is difficult when you look back as a health conscious adult and realize how much that company was trying to brand me and how my school was letting them do it for money.
There were other food-based programs when I was in school, but for some reason this one really sticks out in my mind. Maybe it was my favorite, I don’t know. It is just another one of those realizations I have that I am fortunate to have become a healthy adult who knows the value of nourishing food. I, of course, had my mom trying to get me to eat healthy and my dad providing fresh foods from the garden, but some kids aren’t so blessed.
If you don’t have kids, what programs do you remember from school and how do you feel about them now?
If you do have kids, I’m really interested in knowing how you handle these food brands and incentives when it comes to your own children.

PS. Much to the likely disappointment of that pizza chain, their branding didn’t seem to work. It is by far my least favorite pizza today. Not sure why that is. Maybe some others had more influence on me.
Photo of one of my favorite pizzas in Lexington, KY from Mellow Mushroom. So many veggies it weighs a ton!

Café & Cream Shortbread

June 10, 2009

First I have to say that it wasn’t my intention to bombard you with sugary snacks this week, but there were a couple contests I just had to enter. All I could think of were desserts so it turns out this week is focused heavily on desserts. That’s okay. More reason to get in some good workouts towards the end of the week!

Ever since I saw Chow and Chatter’s contest, I’ve been trying to come up with a coffee inspired creation. I finally got the idea the other night and went to work making Café & Cream Shortbread.

A great thing about Brazilian coffee is that is ground into a fine powder. This makes for a very strong cup of joe, but it also makes it ideal for adding directly to baked goods. It dissolves without leaving a gritty texture and adds a lot of coffee flavor. In addition you don’t have to worry about brewing and cooling it ahead of time and it doesn’t add moisture to the recipe.

I decided to start with a traditional shortbread and this is more like a brown sugar shortbread. The reason being that instead of white sugar, I used mascavo sugar. It is possible to find this in the US at Latin Markets, or so I’ve heard. It is an unrefined sugar which is dried and sifted after the sugar cane is harvested. It acts much like our processed brown sugar in baking, but adds a stronger flavor. Sometimes I like the flavor sometimes I don’t, but on this occasion it worked well.

In half the dough I added cocoa powder and ground coffee. In a perfect world these would have come out as a more defined checker board, but it has been forever since I’ve made checkered cookies and my skills are apparently a little rusty.

That didn’t affect the flavor though. This shortbread is soft and flaky melting in your mouth almost immediately. The sugar gives it just enough sweetness which is slowly overtaken by the strong coffee flavor with each bite.

Café & Cream Shortbread

1 cup unsalted butter, at room temp
½ cup mascavo sugar
½ tsp vanilla
2 cups flour (I used white, but others may work well too)
2 tbsp cocoa powder
1 tbsp ground coffee (espresso powder would work too)

Cream butter and sugar. Add in vanilla. Slowly mix in flour. Dough will be crumbly. Press dough together and split into two equal parts.

Transfer one half to a sheet of plastic wrap. Press together to form the dough more and wrap in plastic as you shape it into a square log. Refrigerate for about 15 to 30 minutes.


To the remaining dough, mix in cocoa powder and coffee. Repeat the same process forming it into a square log shape. Refrigerate for about 15 to 30 minutes.

Preheat oven to 350 degrees F. Remove dough from fridge. If it is too hard to work with allow to sit at room temp for a bit to soften. Cut each log into four equal strips. Arrange the dark and light strips so that they alternate, make two stacked rows. Wrap in plastic and from into a square log, pressing the dough together slightly. Unwrap and cut cookies about ¼ inch wide.


Place on an ungreased cookie sheet. Bake for 8 to 10 minutes. Let cool for 1 to 2 minutes and carefully transfer from cookie sheet to cooling rack. Makes 12 to 15 cookies.

Raspberry and Rhubarb

June 8, 2009
Well, I’m back at my laptop in Brazil. A bit groggy and jet-lagged, but settling in okay. Thanks for all the well-wishes regarding my trip!

A few days before I left the US I got the baking bug so I decided to experiment with a few new flavors. I’ve been seeing a lot of rhubarb cupcakes out there and my parent’s still had a ton of it available in the garden. The new raspberries were just starting to come on, but there weren’t enough to do much more with then eating fresh so I turned to some frozen ones from last summer.

Rhubarb and strawberry is such a popular combo, so I thought I probably couldn’t go wrong with raspberry as strawberry substitute. I was right. Rhubarb and raspberry is every bit as good as the old standard.

My experiment started with finding a Rhubarb Cupcake recipe from Coconut & Lime. I wanted mine to be a bit different though. I don’t like chunks of rhubarb so I cooked mine down with just a teaspoon of water and a teaspoon of sugar. The transformation is shown below. Then we had some buttermilk to use as well so I substituted that.


The frosting is a traditional butter cream with some raspberry sauce stirred in. The raspberry sauce came from extra I had left over when making a fresh batch of the Raspberry Oat Bars I posted about a few months ago. I put some of this directly in the frosting and ended up with a vibrant pink cupcake topping that was sweet with an underlying tartness.

Due to the extra moisture from my cooked rhubarb this cupcake has more of a sponge cake consistency. This can be changed by adding more flour if you desire.

I was thrilled with the results and I will make these again. Next time I plan to turn it into a sheet cake. The tartness balances nicely with the sweet flavors and it is a perfect combination of ingredients that represent this time of year well.

Raspberry Rhubarb Cupcakes

Cupcakes

Adapted from a recipe at Coconut & Lime

½ cup rhubarb, chopped
1 tsp water
1 tsp sugar
½ cup sugar
3 tbsp butter, room temperature
1 egg
½ tsp vanilla
½ to ¾ cup flour
1 tsp baking powder
½ tsp salt
½ cup buttermilk

Place the rhubarb, sugar and water in a small saucepan. Cook at medium high heat, stirring occasionally until the rhubarb cooks down into a jam-like consistency. Remove from heat and set aside.

Preheat oven to 350 degrees F and line a cupcake tin with six liners.

Cream the sugar and butter then mix in the egg and vanilla. Add in the flour, baking powder and salt and mix just until combined. Finally mix in buttermilk and then fold in the rhubarb.
Distribute batter evenly into the six muffin liners and bake for about 15 to 20 minutes, or until cupcakes are lightly browned and an inserted toothpick comes out clean. Let cool.

Raspberry Frosting

¼ cup butter (1/2 stick), room temperature
2 ½ – 3 cups powdered sugar
½ tsp vanilla
¼ cup raspberry fruit filling (from Raspberry Oat Bars)

Beat the butter and powdered sugar until smooth. Add vanilla and raspberry sauce. Beat until all ingredients are combined and frosting is smooth. If making the frosting on a hot day, you may want to refrigerate it until your cupcakes are ready to decorate.

This recipe will serve as my submission to the Let’s Celebrate Event at Ria’s Collection!

Dark Chocolate Raspberry Bars

May 16, 2009

I have to take a break from Links this weekend because my travels have kept me away from the computer and my usual reading. I feel a bit like I’m not holding up my end of the food blogging deal as I know I’m missing a lot of great posts, but next week will have me back to the computer and catching up.
Before I left for my DC trip I had the chance to play a bit in the kitchen with chocolate and some frozen raspberries from last year’s garden. The new ones are getting ready to come on so my parents need to make some freezer space.
A while back I reviewed one of the Clif Nectar Cacao bars flavored with raspberry and dark chocolate. I really enjoyed it and knew I wanted to try to recreate something similar. My version is baked so they don’t have the same texture as a natural bar, but they are rich and fudgy. They turned out to be somewhat of a cross between a breakfast or energy bar and a dessert.

I’d like to work with it more to reduce the sugar (maybe more or all honey) and up the nutrition content, but I was happy with the results of my first attempt. I started with a Baker’s One Bowl Brownies recipe and adjusted the ingredients. I love how they are not very sweet allowing the flavor of the raspberries and bitter chocolate to shine through. If you want something a bit sweeter my suggestion would be to add more chocolate chips.

Dark Chocolate Raspberry Bars

4 squares unsweetened chocolate
1 ½ sticks butter
1 cup frozen raspberries
1 cup sugar
1/3 cup honey
3 eggs
¾ cup whole wheat flour
¼ cup rolled oats
1/3 cup walnuts
1/3 cup chocolate chips

Preheat oven to 350 degrees F.

In the microwave melt the unsweetened chocolate and butter together until smooth. While still warm, stir in the frozen berries. Microwave again until the berries are fully defrosted and incorporated into the chocolate.

Transfer chocolate to a mixing bowl and stir in sugar and honey, then blend in the eggs. In a food processor, combine the flour and oats. Pulse until the oats are finely ground. Add in the walnuts and pulse until they are chopped into very small pieces.

Add the flour mixture to the chocolate mixture and stir just until combined. Stir in the chocolate chips.

Line a 9 x 13 inch pan with foil and grease the foil well. Pour in the bar batter. Bake for 30 to 35 minutes or until baked through and an inserted toothpick comes out clean. Let cool and slice into bars.
Want to create beautiful food and product photos that you can't wait to share?!
Discover your style, control the light, and shoot using the tool you know how to use (yes, your phone included). Learn about free resources, Live Q&As with Lori, and online courses you can take from anywhere in the world!
We respect your privacy. Unsubscribe at any time.