Archives

Bringhe – Memories of Philippine Kitchens

June 4, 2012

I regularly revisit the goal to challenge myself in the kitchen by experimenting with cuisines from different areas of the world. I don’t always accomplish this goal, but over the past several months I’ve been happy with the variety around here. Foods from South Africa, West Africa, Ireland, Thailand, the Caribbean, and Italy have all found their way into posts.
I owe a lot of this to cookbooks. My most recent endeavor? A closer look at Filipino cuisine.
Other than the Filipino barbecue recipe learned from my husband’s college friend, I have no experience with the cuisine. I’ve not stepped foot in a Filipino restaurant (only because I’ve yet to have the opportunity), and while we entertained the idea of making Manila a stop on our Southeast Asia trip in 2009, it wasn’t meant to be on that adventure. 
So needless to say, I had a lot to learn. After reading this cookbook, I have been thoroughly educated.
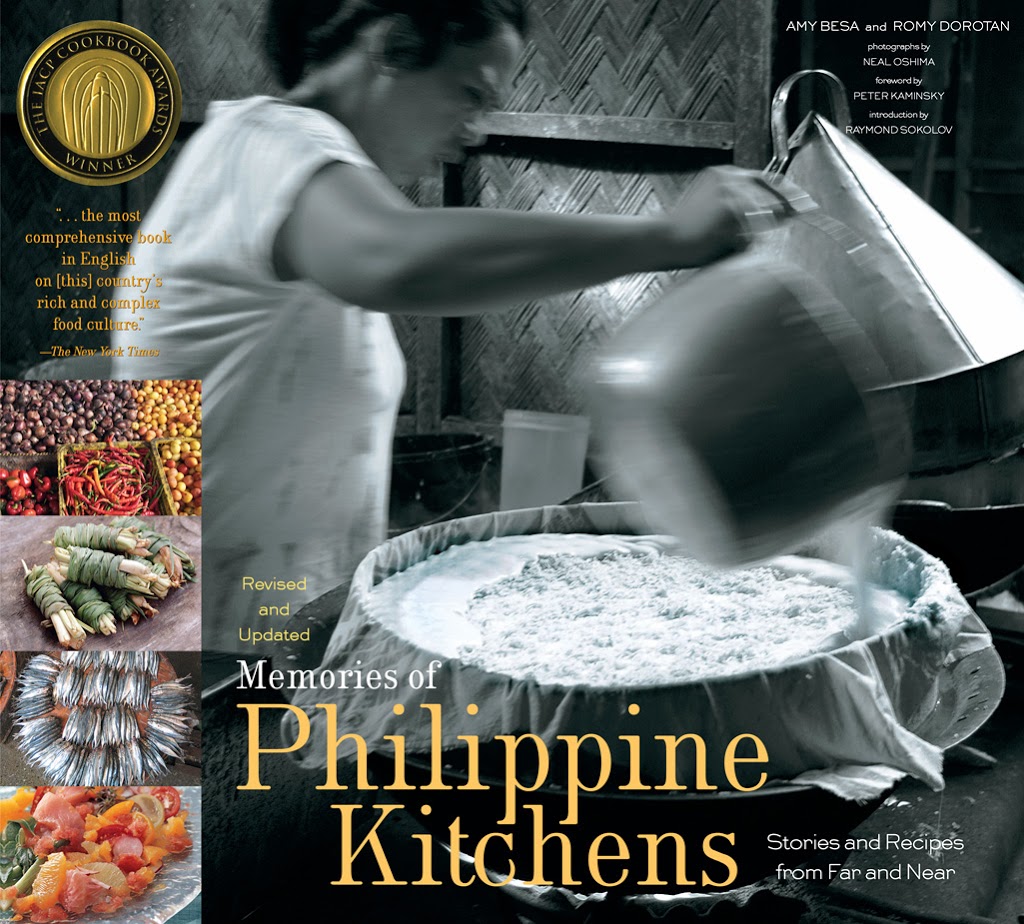
Memories of Philippine Kitchens: Stories and Recipes from Far and Near by Amy Besa and Romy Dorotan is a history book of traditional dishes. I received a revised and updated copy for review just a few weeks ago. The beautiful photos take you there – to the market stalls, to the rustic kitchens – you can almost feel the ingredients your hands and smell them cooking. The recipes make you wonder how you can bring such time-honored practices into your own kitchen; a challenge I welcome.
While taking a journey through geographic regions of the Philippines by way of food, the book introduces the reader to unfamiliar regions, and foods that seem different, but familiar at the same time. Dishes such as the classic Chicken Adobo, sweet Bibingka, and Lumpia. These names only mention the type of food or style of cooking. The recipes and variations seem endless.
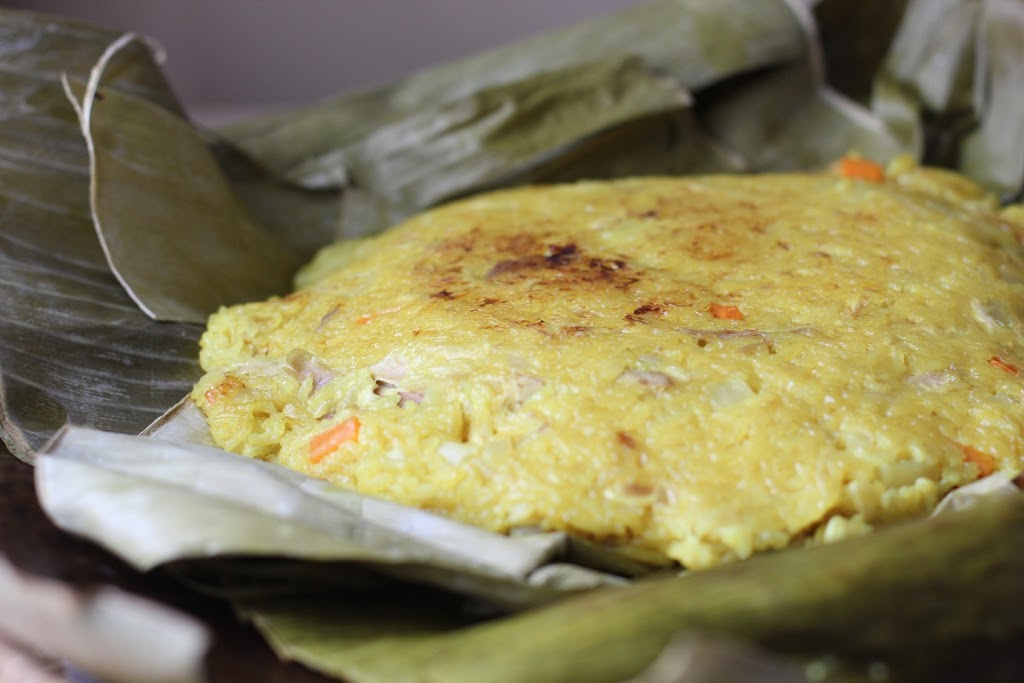
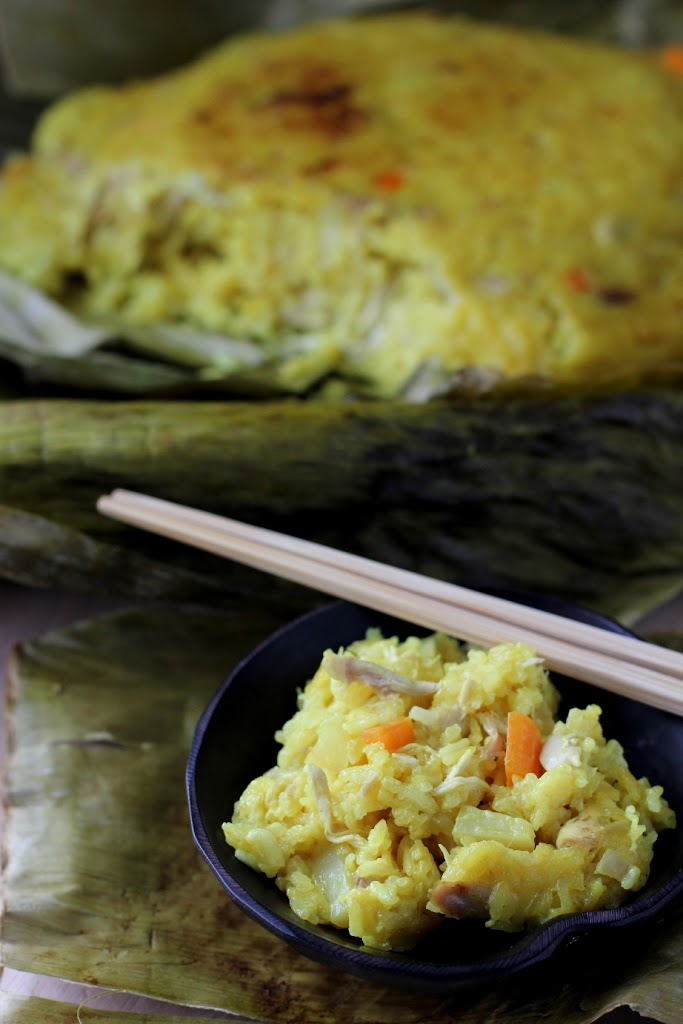
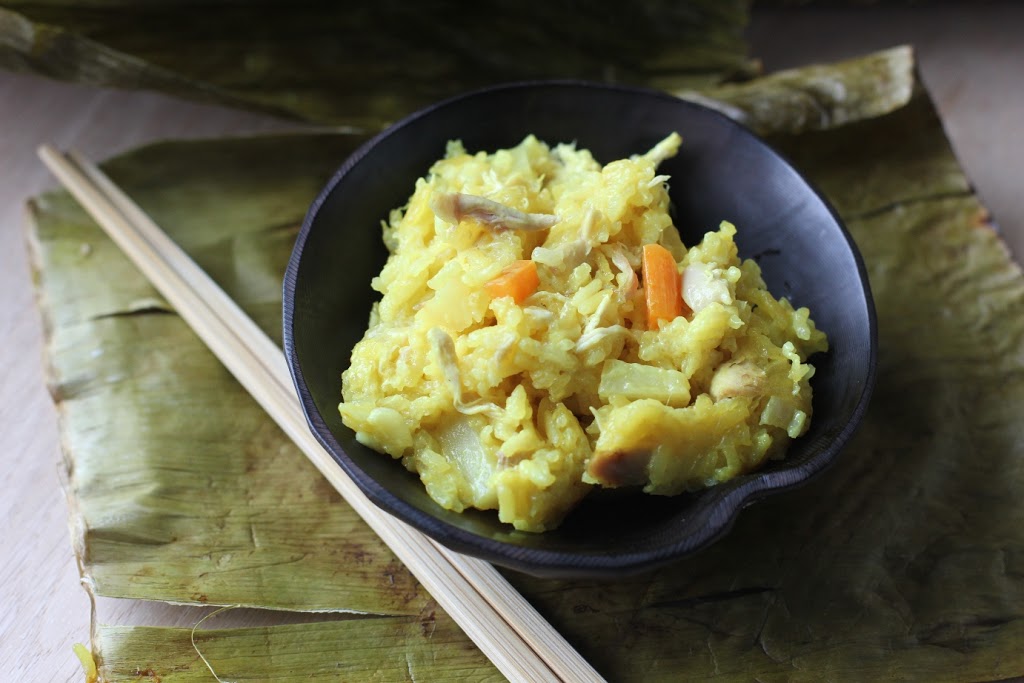
I stopped turning the pages at the province of Pampanga – The Rice Heartland of Luzon. This led me to the Arayat Kitchen where I found Bringhe. The book describes this dish as Filipino paella. I took a quick look at the ingredients, and set out to find some banana leaves which I finally located last week.
I feared steaming a dish in leaves in a wok on my very U.S. American stove would be a difficult task, but this recipe was a breeze. The results were a dinner of nutty sticky rice in coconut milk complete with vegetables and pastured chicken. 
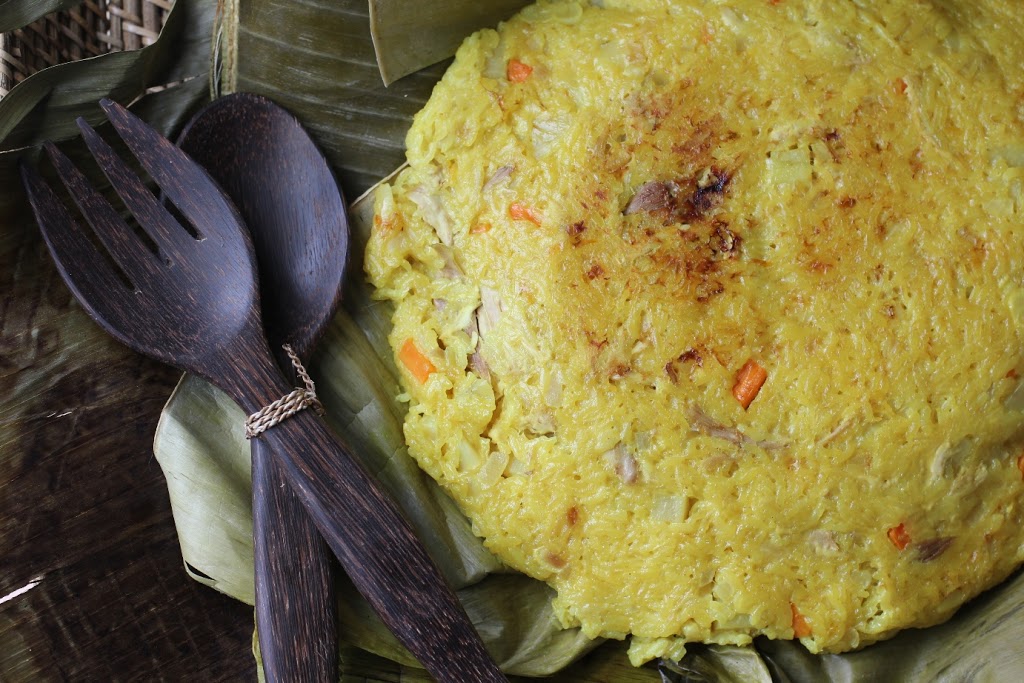
A one-pot meal at its finest.
There are very few times you find a book with so much of a culture within its pages. This book has a prominent place on my food history and culture bookshelf. 
I’m off in search of my next food culture challenge, and considering how many more recipes I want to try in this book, I have a feeling it will be Filipino once again. 
Bringhe
Reprinted with permission from Abrams Books 

Bringhe is a Filipino version of paella, made with glutinous rice and steamed in banana leaves.
Serves 4 to 6
One 3 1/2-pound chicken
1 large onion, quartered
Banana leaf sections, for lining the wok
2 tablespoons canola oil
3 garlic cloves, sliced
1 medium onion, diced
1 red bell pepper, diced
1 large carrot, diced
1 large russet potato, peeled and diced
One 1-inch piece fresh turmeric, peeled and grated
(or 1 teaspoon ground turmeric)
2 cups glutinous rice, soaked overnight in water
to cover, drained well
About 2 cups coconut milk
4 tablespoons fish sauce, or to taste
Place the chicken and quartered onion in a large saucepan and add water to cover. Bring to a boil over high heat, then reduce the heat and simmer, uncovered, until the chicken is tender, about 40 minutes. Remove the chicken, strain, and reserve the broth. Set the chicken aside to cool, then remove the meat from the bones and shred it. Set aside.
Wipe the banana leaves with damp paper towels to clean them. Run them through a flame on both sides to soften them a bit. Grease a large wok (or 2 small woks) and line it with a double layer of banana leaves.
In a large sauté pan over medium heat, warm the oil. Add the garlic, diced onion, and bell pepper and sauté until the onion is translucent, about 5 minutes. Add the carrots and potatoes and cook until softened, about 5 minutes. Add the turmeric and stir for 1 minute, until aromatic.
Add the rice and cook, stirring, until thoroughly coated with the oil, about 5 minutes. Add 1 1/2 cups of the coconut milk, 1 1/2 cups of the reserved chicken stock, and the fish sauce. Bring to a simmer and cook, stirring frequently, until all the liquid is absorbed. 
Add another 1/2 cup coconut milk and 1/2 cup stock and continue to stir until the liquid is absorbed. This should take about 20 minutes—the rice should be tender but al dente. If the rice isn’t cooked through, add more coconut milk and stock. Continue to cook, stirring, until the liquid is absorbed and the rice is cooked through. Add the shredded chicken and cook until warmed through, about 3 minutes.
Fill the prepared wok (or woks) with the rice mixture, smooth the top to create an even layer, cover with the lid or foil, and place over medium heat. Cook without stirring for 20 minutes, or until a golden brown crust that holds the dish together is formed at the bottom of the dish. If the crust hasn’t formed, raise the heat to medium-high and cook for another 5 to 10 minutes to form the crust. Invert onto a large serving plate, remove the banana leaves, and serve.
Disclosure: A copy of this cookbook was sent to me for review purposes. I was not required to write about it, and received no compensation for doing so. Opinions expressed here are my own.

Gardens, Markets and Pure Beef

June 3, 2012


Happy June! 
 
 I was not a fan of summer until I started gardening and exploring Farmer’s Markets. Now summer rates as high on my list as autumn, at least until we get to the hot and humid Augusts we often experience in Kentucky. Until then I will be enjoying all the things of the season.
 
I thought I’d use this post to spread some of the beauty of June through garden and market photos, and to reveal the winner of the Pure Beef cookbook!
 
 
Our garden is coming along nicely except for the extra bugs that are around due to the mild winter. The Roma tomatoes are just now beginning to turn pink on their way to red. The blue potatoes are blooming, and although I’m sad that the strawberries are done, we have picked a few blueberries, and raspberries aren’t far behind!
 
Roma on its way to red!


Eggplant blooms
Blue potato blooms
 
 
Blackberries-to-be


Raspberries
Guard Pug – every garden should have one.


I stopped by our small (but sufficient) Farmer’s Market this weekend for onions and tomatoes. Some of our farmer’s here grow tomatoes in high tunnels so there are already some heirlooms ripe and ready.


All of this produce will go perfectly with some Pure Beef.  By random draw, the winner of the cookbook is LouAnn at Oyster Food and Culture! Congratulations!
 
I’ve been reading LouAnn’s blog for a few years now, and had the opportunity to meet up with her for lunch a few years back when I was visiting California. Do stop by and check out her blog. It is full of so much information on food and culture. I learn something new with each post!
 
Thank you for your comments! I hope you’ll consider getting your own copy of Pure Beef. I’ve been enjoying it so much.

BLT Spinach Salad with Fresh Garlic Dill Dressing

May 31, 2012
BLT Spinach Salad with Fresh Garlic Dill Dressing | Fake Food Free

As much as I love a tasty whole grain, I am aware when I have a few too many grains in my diet. Once spring race training comes to an end, it’s time to slow down on the bread and oatmeal, and replace them with more fruits and veggies. I have to say the timing couldn’t be better as the garden starts to come around.

I love BLTs and this salad is a great option when you’d rather skip the sandwich part. It’s also a good way to use up some of the fresh herbs from the herb garden!

 
BLT Spinach Salad with Fresh Garlic Dill Dressing | Fake Food Free
 
 
BLT Spinach Salad with Fresh Garlic Dill Dressing
 
Makes: 2 servings
 
Ingredients
2 medium tomatoes
1 cup fresh spinach, finely chopped
1 cup lettuce (any variety), finely chopped
5 sweet basil leaves, chopped
4 pieces bacon, cooked crisp and chopped (preferably local, pastured)
 
Dressing:
2 tbsp plain Greek yogurt
1 tbsp water (optional, to thin yogurt if necessary)
1 clove garlic, chopped
1 tbsp chopped fresh dill
1 tbsp chopped fresh chives
Pinch of salt and black pepper
 
Prep
 
Cut the tops off the tomatoes and gently scrape out some of the inside of the tomato with a spoon to create a bowl for the salad. Set aside.
 
In a medium bowl, combine the spinach, lettuce, basil and bacon.
 
In a small food processor, combine the yogurt, water, garlic, herbs, salt and pepper. Process until garlic is finely chopped. Pour dressing over the salad and toss to coat.
 
Place half of the salad into each tomato. Serve immediately. 
BLT Spinach Salad with Fresh Garlic Dill Dressing | Fake Food Free

Tomorrow is the last day to enter to win a copy of the Pure Beef by Lynne Curry! (Giveaway Closed)

Thanks for reading! All images and content are the property of Fake Food Free and Lori Rice unless otherwise stated. Please do not republish full recipes or images without written permission. What is okay? Feel free to Pin images, share links to my posts or share the photo in a round up post with the title of this recipe and a link back to the post. Confused about copyright and food blogs? Here is some helpful information on Recipe Attribution. If you want to use a photo or full recipe, just ask. I’m sure we can work something out.

Pure Beef: Tamarind Beef Satay

May 24, 2012

I first made this delicious beef satay recipe back in 2012. Every summer it continues to be a great go-to meal or snack when we fire up the grill for some outdoor cooking. 

Grilled Tamarind Beef Satay Recipe | Fake Food Free


The email subject read, “As far from fake beef as one can get.”

That was enough to spark my curiosity.

Before I opened it I wasn’t aware of the cookbook that awaited me, of the story that would later have me nodding my head, or the fact that it would be so educational that my husband would hijack it for a day and read the first 70 pages.

Pure Beef Cookbook

The title says a lot, but it does not say it all. I’ve found this cookbook to serve as a novel as I have read through Lynne Curry’s story. Lynne is a former vegetarian who now finds herself in Oregon’s Wallowa Valley enjoying what I can only imagine is one of the most beautiful places on earth with some of the best food.

I live in central Kentucky and it’s pretty beautiful here, too. As I write this I just happen to have a chorus of cows singing from the farm behind our house, but I’ve been to Oregon and I love it. This can be considered – how I related to this book #1.

Number 2, is the story of how a vegetarian came to enjoy the flavor of grassfed beef, culturally, nutritionally, and ethically. To paraphrase roughly, the moment was during her international travels in Guatemala when she was graciously offered grassfed beef as a gesture of hospitality.

Tamarind Beef Satay recipe from the Cookbook Pure Beef


While I have never been a vegetarian, I fully believe that culture and respect for the people of that culture should override what we will and will not eat. I’ve tried many things, and maybe one day I will be put in a position where I just can’t stomach it, but as of now this is my view. It was a view that I felt I shared with the author as I read, making this book even more meaningful.

I was never all that crazy about beef until I enjoyed the local grassfed beef of the Bluegrass. This opportunity occurred only about 2 years ago when we returned to the States. Now it is the only beef I will buy. There are many reasons for this, and I will let you read through these when you get your copy of Pure Beef. Considering my background, nutrition is one reason.

As I moved past the why of the book, I got to the how. How to cut beef, how to buy it, how to cook it. I still have a lot more to read, but this is as much a resource for my library as a cookbook.

Then you get to the recipes. There truly is a recipe for every cut, and an endless amount of tips on how to cook it all. Coffee Bean-Chile Rubbed Sirloin Roast, Boneless Oxtail and Buckwehat Crepe Purses, and Baked Argentinian Empanadas to name a few.

There are side dishes and condiments galore as well, with and without beef, such as Roasted Corn Salsa, Butternut Squash Bread Pudding, and Lemony Chard Bundles. There are also variations on recipes such as the gluten-free meat loaf.

There were too many great recipes to choose from, so I had to use a bit of a spin-the-bottle approach to select one. I landed on Tamarind Beef Satay.

Tamarind Beef Satay


We picked up a tri tip from our local grassfed beef source, Marksbury Farm Market. It worked beautifully and all the credit has to go to my husband. One tip he picked up from the book was to freeze the meat for about 20 minutes before slicing it thinly for the beef satay. He sliced, I mixed the marinade.

This recipe is simple and the beef satay cooked up on the grill quickly. The sweet and tart flavors of the tamarind, honey and fish sauce go so well together. Next time I’ll probably add just a little more chile sauce because we are spicy food fans. We served up the satay with grilled corn and a green salad. Easy and delicious!

Tamarind Beef Satay

Recipe reprinted with permission from Pure Beef © 2012 by Lynne Curry, Running
Press, a member of the Perseus Book Group.

From the book:

Tamarind is an intoxicating sour and sweet fruit from Indonesia where satay is the go-to snack on a stick. It is incredible with beef, so I created a tamarind marinade that lacquers thin beef strips to grill or broil. Satay makes a wonderful appetizer; to fill it out for a main dish, I accompany it with another Indonesian favorite, a fruit salad called Rujak, which has as many renditions as pasta salad does in this country. My version is a beautiful chopped salad of cucumbers, jicama, pineapple, and mango that’s crunchy, juicy, sweet, and tart. Served along with Sticky Rice or steamed rice, it turns satay into a tantalizing meal, just the thing to wake up your taste buds in the middle of winter.

Makes 4 servings as a main dish; 8 as an appetizer

3 tablespoons tamarind paste*
3 tablespoons honey
1 tablespoon fish sauce

1/2 teaspoon chile sauce, such as sambal oelek
1/8 teaspoon salt
1/2 cup unsalted dry roasted peanuts
1 to 1 1/2 pounds top sirloin steak, sliced into 1/4-inch thick strips

Mix the tamarind paste, honey, fish sauce, chile sauce, and salt in a medium-sized bowl. Pound the peanuts in a mortar and pestle or in a heavy-duty plastic bag with a rolling pin to the texture of fine breadcrumbs and stir into the tamarind sauce. Put the beef strips in the bowl, toss to coat, and marinate for about 15 minutes at room temperature.

Preheat a charcoal or gas grill for high heat (425°F to 475°F), scraping the grate clean and oiling it lightly, or preheat the broiler. Thread the slices onto wooden or metal skewers, stitching the beef on and then stretching it along the skewer so that it looks like a miniature banner. Thread any short strips onto the same skewer.

Grill or broil the skewers for 1 to 2 minutes per side and serve the satay warm or at room temperature.

*Note: Tamarind is available from Asian grocery markets in several different forms. Tamarind paste is the easiest form that can be used straight from the jar. If your tamarind is labeled concentrate, use only 1 tablespoon and mix it with 2 tablespoons water. If you have a block of tamarind, chop about 1/2 cup of it, use a fork to mash it with 6 tablespoons of boiling water, and let it soften for about 5 minutes. Use a fine-meshed strainer to extract 3 tablespoons of pulp, pressing on the mixture firmly with a spoon.


Disclosure: A copy of this cookbook was sent to me for review purposes. I was not required to post about it and received no compensation for doing so.

Borekitas: Hazan Family Favorites

May 21, 2012

When I received my copy of the Hazan Family Favoritescookbook I will admit I had to do some research. There is no doubt that this speaks to my lack of knowledge of Italian cuisine.  It made me think about how it is possible to feel affection for a cuisine without really knowing it at all.


There is no question that I love homemade pasta and marinara sauces, or that I believe they are 100% worth the time and effort it takes to make them. I enjoy bean soups and simple meat cutlets, and the other elegant offerings that come from an Italian kitchen.

What I think I have often overlooked is the simplicity. 

In case you have some more to learn about Italian cooking like I did, the book was written by Guiliano Hazan. He is the son of Marcella Hazan whose cookbooks are credited with introducing the United States to traditions and techniques of Italian cooking. 

The book is a collection of recipes rescued from a fifty-six year-old notebook. As you flip through it and see the pictures you can feel the history and importance of its pages.

What you also see when you read the recipes is simplicity. Most of the recipes use only a handful of fresh ingredients to create a stunning end product. It’s impressive, educating, hunger-inducing, and it makes you think – okay, I’m ready to begin mastering the art of Italian cooking. 

Or if you are like me, it may also make you think – okay, let’s book the trip to Italy!


Amid the Fettuccine with Orange, Fried Parmesan Cheese-Battered Lamb Chops, and the Peach-and-Strawberry Semifreddo, the Borekitas caught my attention. What’s not to love about spinach, feta and ricotta stuffed into a bite-size pastry? Absolutely nothing. These are delicious. 


Borekitas
From Hazan Family Recipes, reprinted with permission from Abram Books 
 
Time from start to finish: 1 hour and 15 minutes
Makes about 20 borekitas 

From the cookbook:
My parents and I went to my grandparents’ almost every Friday for Shabbat dinner. I can still
taste and smell the wonderful little pies my Nonna Giulia made, which she called borekitas.
She made them either with a dough shell or a phyllo shell. The fillings were spinach or cheese.
In attempting to replicate them, I used Claudia Roden’s The Book of Jewish Food as a guide.
Both the cheese and spinach fillings below are just like what I remember, and the dough shell,
my favorite of the two, is just as good as the one Nonna Giulia used to make.


FOR the dough
4 tablespoons butter
1 1/2 cups all-purpose flour
1/4 cup vegetable oil
1/4 teaspoon salt

FOR the spinach filling (I made the spinach)
1/2 teaspoon salt
8 ounces fresh spinach, washed
1 ounce feta cheese
2 tablespoons whole-milk ricotta cheese


Cut the butter into small pieces and allow to come to room temperature.

Put all the ingredients in a food processor with 1/4 cup water and run it until a smooth, homogeneous dough forms. If it crumbles when pinched, mix in a little more water, 1 tablespoon at a time, until the dough is soft and smooth when pinched.

Wrap the dough in plastic and let it rest for about 20 minutes before using.

Spinach filling
In a pot large enough to cook the spinach, put about 2 inches of water, and place over high heat. When the water is boiling, add the salt and spinach. Cook until tender, 2 to 3 minutes, then drain.

Once the spinach is cool enough to handle, squeeze the excess water out and coarsely
chop. Place the spinach in a bowl. Crumble the feta and add it along with the ricotta. Mix thoroughly.


Assembling the borekitas
Preheat the oven to 350°F on the bake setting.

Take about a walnut-size ball of dough, place it on a counter, and press it with your fingers into a disk 2 inches in diameter. Put about 1 tablespoon of either cheese or spinach filling on the disk. Fold the disk over the filling to form a half-moon shape, making sure to pinch the open sides together to seal them, and place on a baking sheet, either oiled or lined with a nonstick baking mat.

When all the borekitas are assembled, bake until golden brown, about 20 minutes. Serve warm.


Disclosure: A copy of this cookbook was sent to me for review purposes. I was not required to post about it and received no compensation for doing so. 

Strawberry Recipes

May 15, 2012

A past recap of some of my favorite strawberry recipes on Fake Food Free! As I read this, updating this post comes at a good time! Three years later I’m upgrading to another new camera in a few weeks!

You don’t know how dependent you are on something until it breaks down. For most people this is associated with a car or a washing machine, but for the past week and half, for me, it’s been my camera. I didn’t realize that it was possible to miss a camera, but I do now. I can’t count how many times I’ve seen something I want to photograph and then feel cranky when I remember I can’t do so.

Oh, and did I mention I have also realized how much of a photo snob I am now? I could, of course, use the point and shoot, but then I think – nah, it won’t give me the right depth of field or color. Yeah, it’s that bad.

The camera drama started a little over two weeks ago when my Canon Rebel Xsi body died. I made the decision to upgrade to the 60D so quickly, and the trade in went so smoothly that there was barely a hiccup in my posting. Then I started having problems with the autofocus with the new camera. I called Canon for tech help, and back went the camera for an exchange.

Now it’s been a week, and I’m still waiting…

Instead of keeping these pages blank for too long I thought I would recap some of my favorite recipes from the archives. Our strawberry season is coming to a close, but I know for many it is just starting. So here are a few ways we’ve used strawberries around the Fake Food Free kitchen.

Favorite Strawberry Recipes from Fake Food Free

Strawberry Pecan Pancakes

  
Favorite Strawberry Recipes from Fake Food Free
 

Whole Grain Rhubarb Waffles with Strawberry Butter

 
Favorite Strawberry Recipes from Fake Food Free
 

Strawberry Rhubarb Bread

 
Favorite Strawberry Recipes from Fake Food Free
 

Spring Garden Cobb Salad 

 
Favorite Strawberry Recipes from Fake Food Free 

Easy Fresh Strawberry Ice Cream

 
Favorite Strawberry Recipes from Fake Food Free

Strawberry Rosemary Shortbread


Thanks for reading! All images and content are the property of Fake Food Free unless otherwise stated. Please do not republish full recipes and images without written permission. What is okay? Feel free to Pin images, share links to my posts or share the photo in a round up post with the title of this recipe and a link back to the post. Confused about copyright and food blogs? Here is some helpful information on Recipe Attribution. If you want to use a photo or full recipe, just ask. I’m sure we can work something out.  

Strawberry-Lime Salsa with Homemade Flour Tortillas

May 7, 2012

Strawberry-Lime Salsa with Homemade Flour Tortillas | Fake Food Free

It’s strawberry season! For the second year in a row we’ve been blessed with plants that keep on giving. For the past two weeks we’ve been getting one or more boxes of berries like this almost everyday.

Kentucky Garden Strawberries and a Strawberry-Lime Salsa Recipe | Fake Food Free
 
While I may get overwhelmed with herbs and peppers throughout the summer, that never happens with strawberries. Any that aren’t going in my mouth are going in the freezer!
 
It’s difficult to eat them any way but straight out of the box, but I’ve managed to create a few things that aren’t berries in a bowl or berries in oatmeal. One is this salsa.
 
Strawberry-Lime Salsa with Homemade Flour Tortillas | Fake Food Free
 
I’ve always liked a little fruit in my salsa, but I was introduced to strawberry salsa last year through a recipe program with the Kentucky Proud local food project we have here and Cooperative Extension.
 
I wasn’t sure how I’d like strawberries and tomatoes together, but one bite and I was sold. It’s so good.
 
This is my take on strawberry salsa. I decided to serve it up with some mini flour tortillas. I have been hooked on these tortillas from the Homesick Texan. I’ve made corn tortillas, but I just made these flour tortillas for the first time a couple weeks ago and I’ve made them two more times since! This time I made them much smaller to create an appetizer-sized serving plate for the salsa.
 
Strawberry-Lime Salsa with Flour Tortillas
 
Makes: 24 bite-size snacks
 
Ingredients
 
4 Roma tomatoes, de-seeded and chopped
1 cup diced strawberries
3 green onions, whites and greens sliced
¼ cup fresh cilantro, chopped
Juice and zest of one lime
½ to 1 teaspoon fine ground sea salt
Plain Greek yogurt or sour cream for serving (optional)
 
Prep
 
Combine the tomatoes, strawberries and onions in a bowl. Add the cilantro, lime juice and lime zest. Stir to combine all ingredients. Stir in the salt to taste. Refrigerate for at least 30 minutes before serving.
 
You can find the flour tortilla recipe at the Homesick Texan. When you are ready to cut the dough, cut it into 24 small pieces and follow the instructions provided there. Be sure to roll it very thin. It will puff up during cooking.
 
To serve, top each tortilla with a tablespoon of salsa. Garnish each with a ½ teaspoon of yogurt or sour cream, if using. Serve right away.

Strawberry-Lime Salsa with Homemade Flour Tortillas | Fake Food Free


Thanks for reading! All images and content are the property of Fake Food Free unless otherwise stated. Please do not republish full recipes and images without written permission. What is okay? Feel free to Pin images, share links to my posts or share the photo in a round up post with the title of this recipe and a link back to the post. Confused about copyright and food blogs? Here is some helpful information on Recipe Attribution. If you want to use a photo or full recipe, just ask. I’m sure we can work something out.  

Mint Julep Blondies (Pecan Blondies with Bourbon Mint Buttercream)

May 4, 2012
Mint Julep Blondies (Pecan Blondies with Bourbon Mint Buttercream) | Fake Food Free
 

When people tell me they want to visit central Kentucky, I always say — come in April or October. Not only is the weather gorgeous, but the horses are running at Keeneland in Lexington.

The exception to this rule? You want to experience the Kentucky Derby. Then you’ll need to visit the first week in May.
Derby week is one of the best times to be in the state. There is a spirit of excitement in the air, and everyone is focused on everything Kentucky from food, to bourbon, to hats, to horses.

We’ve never been to the Derby, but we take part in the celebration. Last Saturday my husband and I ran the Kentucky Derby Half Marathon, an event that kicks off the week’s festivities.

Mint Julep Blondies (Pecan Blondies with Bourbon Mint Buttercream) | Fake Food Free

To further celebrate the big day, I’m always on the lookout for ways to recreate Derby favorites. Last year I went with Mint Julep Scones and Bourbon Chocolate Chip Pecan Cookies with coconut oil.

The Mint Julep is the classic Derby drink that combines Kentucky bourbon with mint-infused simple syrup. Chocolate chips, pecans and bourbon are the traditional ingredients in Derby day pie.

I find that mint rarely has it’s time to shine, especially right now when it’s at peak season in the herb garden. In order to give it the attention it deserves, I stuck with the Mint Julep theme again this year, but I decided on a dessert.

These pecan blondies have a touch of mint-infused simple syrup in the batter, and then they are topped off with a bourbon mint buttercream frosting!

Whether you prefer drink or dessert, enjoy your Mint Julep and celebrations of the Bluegrass State!

Mint Julep Blondies (Pecan Blondies with Bourbon Mint Buttercream) | Fake Food Free
 
Mint Julep Blondies
Makes: 9 blondies
Write a review
Print
Pecan Blondies
  1. ½ cup (one stick) unsalted butter, melted
  2. 1 cup mascavo/muscovado sugar*
  3. 1 large egg
  4. ½ teaspoon pure vanilla extract
  5. 1 tablespoon mint-infused simple syrup**
  6. Pinch of sea salt
  7. 1 cup unbleached, all-purpose flour
  8. 1/3 cup chopped raw pecans
Bourbon Mint Buttercream Frosting
  1. ¼ cup unsalted butter, softened
  2. 2 cups powdered sugar
  3. 2 ½ tablespoons Kentucky bourbon
  4. 2 leaves fresh mint, very finely chopped
  5. Pinch of salt
Blondies
  1. Preheat the oven to 350 degrees F, and grease an 8x8 inch pan.
  2. In a large mixing bowl, stir together the melted butter and sugar. Add the egg and continue to stir until it is blended into the batter. Add the vanilla and simple syrup. Stir in the salt.
  3. Gently fold in the flour. Mix just the dry ingredients are blended in. Finally, stir in the pecans.
  4. Pour the batter into the prepared pan, and spread evenly. Bake for 20 minutes, or until the edges are browned and the center is firm. Remove from the oven and cool on a wire rack.
Frosting
  1. Beat the butter and powdered sugar together until the butter is distributed throughout the sugar. Add the bourbon and beat until light and fluffy, about 1 minute. Add the mint and salt, and beat about 30 seconds more.
  2. Frost the blondies and serve.
Notes on ingredients
  1. *Brown sugar can be used in place of mascavo sugar, but if you can find mascavo, I encourage you to try it. I still have friends from Brazil bring it to me when they travel to the States because it is so affordable there. I did recently find it at our Asian market here (more often called muscovado). It is much less expensive in an international market, and in a larger quantity than what you will find in a health food store.
  2. **You can make mint-infused simple syrup by combining 1 cup water with 1 cup sugar in a saucepan. Bring to a simmer and cook until the sugar dissolves. Remove from the heat, and place several sprigs of fresh mint in the syrup. The mint will infuse the syrup as it cools. Once cooled (it's best when left to infuse for several hours) remove the mint and store the syrup in an air tight container in the fridge for up to 2 weeks.
Adapted from Basic blondie recipe originally adapted from a recipe Smitten Kitchen
Fake Food Free https://www.fakefoodfree.com/


Mint Julep Blondies (Pecan Blondies with Bourbon Mint Buttercream) | Fake Food Free

Thanks for reading! All images and content are the property of Fake Food Free unless otherwise stated. Please do not republish full recipes and images without written permission. What is okay? Feel free to Pin images, share links to my posts or share the photo in a round up post with the title of this recipe and a link back to the post. Confused about copyright and food blogs? Here is some helpful information on Recipe Attribution. If you want to use a photo or full recipe, just ask. I’m sure we can work something out.  

Thai Fish Cake Stuffed Portabella Mushrooms

April 26, 2012

Thai Fish Cake Stuffed Portabella Mushrooms Recipe | Fake Food Free

I buy portabella mushrooms only on occasion, but I think I may be stuck in a rut with how to serve them. When I bought this round I had the thought – why don’t I stuff them with some sort of fish?

Oh wait, I already did that. 

But this is different. This time around I couldn’t stop thinking about Thai fish cakes. So I went with cod instead of salmon, grabbed the lemongrass and a Bird’s eye chili out of the freezer, and reached to the back of the pantry for the panko and fish sauce. This one is a keeper, and I’m sold that portabellas are good for so much more than burgers!
Thai Fish Cake Stuffed Portabella Mushrooms Recipe | Fake Food Free


Thai Fish Cake Stuffed Portabella Mushrooms

Makes 2 servings

Extra virgin olive oil
2 portabella mushroom caps, cleaned
2 tbsp fresh chives, chopped
2 inch piece lemongrass, minced
1 Thai Bird’s eye chili, minced
2 cloves garlic, minced
1 tsp freshly grated ginger
¼ tsp salt
¼ tsp ground coriander 
1 tsp fish sauce
1 large egg
3 oz. fillets cod, cooked, cooled and flaked
½ to ¾ cup panko bread crumbs

Preheat the oven to 400 degrees F. Coat the mushrooms in a thin layer of olive oil, and grease a shallow baking dish. Set aside.

In a mixing bowl, combine the chives, lemongrass, chili, garlic, ginger, salt, coriander and fish sauce. Add the egg and beat the ingredients with a fork until the egg is blended with the herbs and spices. Add the fish breaking it into small pieces.

Stir in ½ cup of the bread crumbs. How much you need will depend on the moisture in your fish. I used a frozen fish that I baked so it held in a lot of water. You want the fish cake to form and hold a patty shape. Add more bread crumbs until you reach this stage. I added all ¾ cup.

Divide the fish cakes and press the stuffing into the mushroom caps, mounding it as you flatten and press it. Bake for 25 to 30 minutes or until the fish cake is browned and the mushroom tender.


Thanks for reading! All images and content are the property of Fake Food Free unless otherwise stated. Please do not republish recipes and images without written permission. Feel free to Pin images and share links to my posts, but please do not copy and paste recipes or photos and share them on other sites. Confused about copyright and food blogs? Here is some helpful information on Recipe Attribution.

Mango Pecan Scones

April 23, 2012

I love Ataulfo mangos. The next best thing to eating them fresh is using them for baking. Try them in these mango pecan scones!
Mango Pecan Scones | Fake Food Free #baking #recipes


The best thing about April to October in Kentucky is the constant availability of in-season foods. Whether they are local, or specialty imports, once April comes the growing season starts moving along.

Each food has its time to shine, but it fades quickly. It is difficult to be too sad to see one go, though, as the next one is right around the corner.

For me this year it started with Ataulfo mangos. I took full advantage of their short season by purchasing a full case, something I rarely do. After some coconut sticky rice and fruit salad snacks, I froze a few to enjoy later this summer.

Mango Pecan Scones | Fake Food Free #baking #recipe


I decided to reserve the last one for some baking which resulted in Mango Pecan Scones! These whole grain scones were a great way to celebrate the short season for this fruit. I’m sad to see those mangos go, but strawberries are right around the corner!

Mango Pecan Scones
 
Makes: 8 scones
Ingredients
1 1/4 cups white whole wheat flour
2 ¼ tsp baking powder
3 tbsp raw sugar (I use Demerara)
¼ tsp salt
¼ cup raw pecans, chopped
¼ cup cold unsalted butter
1/3 cup mango, puree (about 1 Ataulfo mango)
1 tsp pure vanilla extract
½ cup buttermilk
2 tbsp raw sugar, for topping
 
Instructions
 
Preheat the oven to 400 degrees F.
 
In a medium bowl, stir together the flour, baking powder, 3 tablespoons of sugar, and salt. Add the pecans, and stir to coat them with the flour.
 
Cut the butter into the flour, and use two knives or a pastry blender to mix until the butter is in pea-size pieces and distributed throughout the flour.
 
Stir in the mango, vanilla and buttermilk. Combine until a dough is formed. Turn the dough ball onto a floured surface and shape into a circle, about ½ inch in thickness.
 
Cut like a pie into 8 wedges. Place the scones on a lightly greased baking sheet, or on a baking sheet covered in a silicone mat. Sprinkle with the scones with the remaining raw sugar. Bake 12 to 15 minutes or until the edges begin to brown. Remove from the baking sheet and cool on a wire rack. Serve warm or at room temperature. 
 
 
Thanks for reading! All images and content are the property of Fake Food Free unless otherwise stated. Please do not republish full recipes and images without written permission. What is okay? Feel free to Pin images, share links to my posts or share the photo in a round up post with the title of this recipe and a link back to the post. Confused about copyright and food blogs? Here is some helpful information on Recipe Attribution. If you want to use a photo or full recipe, just ask. I’m sure we can work something out. 


Want to create beautiful food and product photos that you can't wait to share?!
Discover your style, control the light, and shoot using the tool you know how to use (yes, your phone included). Learn about free resources, Live Q&As with Lori, and online courses you can take from anywhere in the world!
We respect your privacy. Unsubscribe at any time.