Archives

Tex Mex Poblano Eggplant Pizza Recipe

July 18, 2012

Whenever we have a garden, I always grow some variety of eggplant. Then once it’s ready for harvest, I wonder what to do with it! This is eggplant pizza recipe is one I came up with a few years ago and it remains a favorite.

Tex Mex Poblano Eggplant Pizza Recipe | Fake Food Free
 
 
Unlike some other veggies in the garden, we aren’t bombarded with eggplant, but we do have enough to cook up a few meals. The type we bought this year is a purple eggplant that is small and round, as opposed to the long Japanese-style we’ve had in years past. Their size reminds me of pepperoni when they are sliced so I guess that is why I thought to use them on pizza.
 
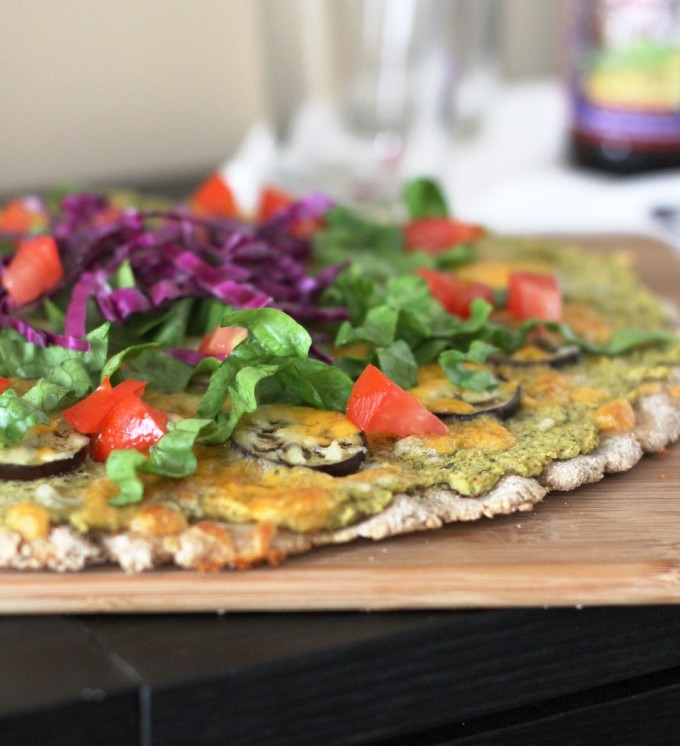
For this pizza, I used my favorite crust from Food Embrace, this time with whole wheat flour and corn meal. The spicy beans take the place of the sauce. I had white beans to use up, but pinto or black would work great too.
 
Tex Mex Poblano Eggplant Pizza Recipe | Fake Food Free
 
 
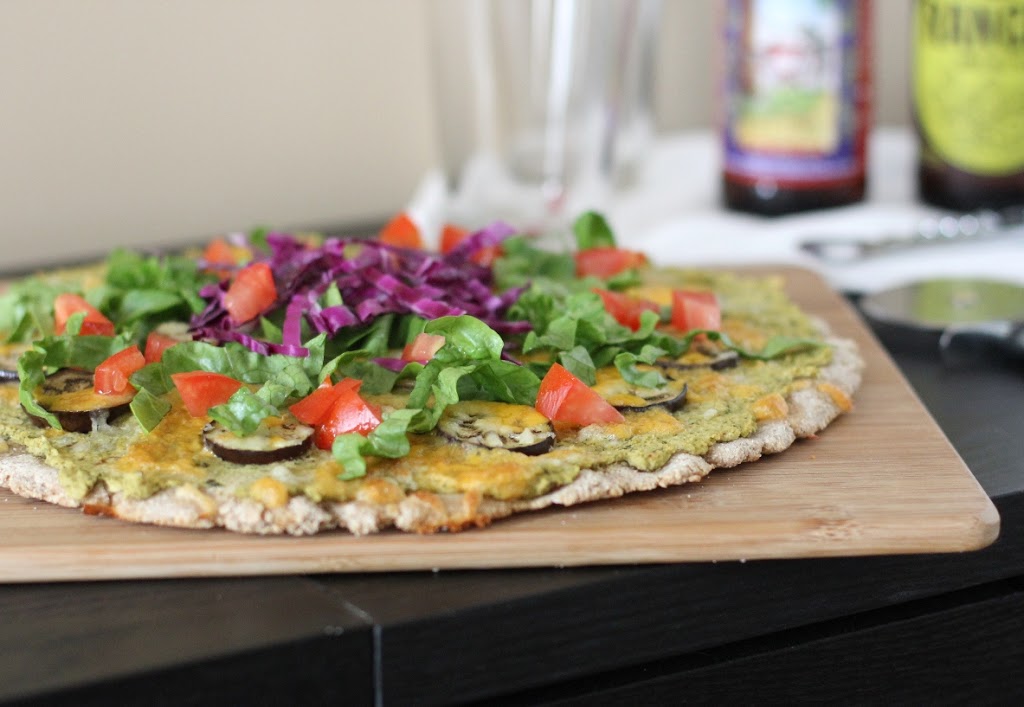
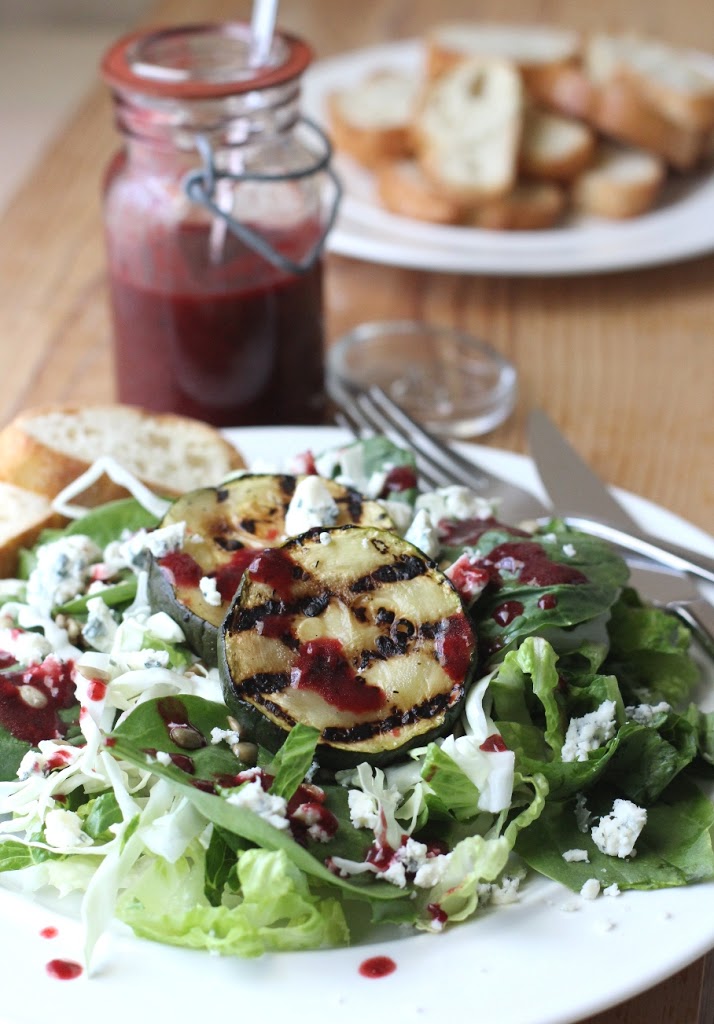
Once the pizza is out of the oven you can garnish it with all kinds of fresh colorful ingredients. I used romaine lettuce, purple cabbage and diced tomato. 
 
Tex Mex Poblano Eggplant Pizza
Makes: 3 to 4 servings
Write a review
Print
Ingredients
  1. 3 Poblano peppers, halved and seeds removed
  2. 1 small onion, peeled and quartered
  3. 3 cloves garlic, peeled
  4. 1 1/2 tablespoons extra virgin olive oil
  5. 1 ½ cup cooked black, white or pinto beans
  6. ½ teaspoon salt
  7. ½ teaspoon cumin
  8. ¼ teaspoon chipotle chili powder
  9. ¼ teaspoon crushed red pepper
  10. 1, 14-inch pizza crust, rolled thin
  11. 3 small or mini eggplants, sliced
  12. ½ cup shredded cheddar cheese
  13. ¼ cup shredded mozzarella cheese
  14. Shredded ettuce, sliced purple cabbage and diced tomatoes for garnish
Instructions
  1. Preheat the oven to 425 degrees F.
  2. Place the poblano peppers on a baking sheet, cut side down. Add the onions and garlic cloves to the baking sheet. Drizzle with about a ½ tablespoon of olive oil, and rub over the vegetables. Roast the vegetables in the oven for about 20 minutes, and then set aside to cool.
  3. Add the beans to the bowl of a food processor. Remove any burnt or separated skin from the peppers, and add the roasted peppers, onions and garlic to the beans. Add the salt, cumin, chipotle powder, crushed red pepper and remaining 1 tablespoon of olive oil. Pulse on high until a smooth paste is formed.
  4. Spread the bean paste over your pizza crust. Lay the eggplant slices in a single layer evenly over the beans. Sprinkle with the cheeses.
  5. Bake for 10 - 15 minutes, or until the edges of the crust begin to brown and the cheese is bubbly.
  6. Top with shredded lettuce, cabbage and diced tomatoes before serving.
Fake Food Free https://www.fakefoodfree.com/
 

Tex Mex Poblano Eggplant Pizza Recipe | Fake Food Free 

 
Thanks for reading! All images and content are the property of Fake Food Free unless otherwise stated. Please do not republish full recipes and images without written permission. What is okay? Feel free to Pin images, share links to my posts or share the photo in a round up post with the title of this recipe and a link back to the post. Confused about copyright and food blogs? Here is some helpful information on Recipe Attribution. If you want to use a photo or full recipe, just ask. I’m sure we can work something out.  

Honey-Pecan Tomato Tarts with Blue Cheese Recipe

July 12, 2012
This recipe for tomato tarts is one of my favorite tomato recipes of all time. I first made them back in 2012 and I’ve been recreating them since. They are well worth firing up the oven in the summer!
 
Honey-Pecan Tomato Tarts with Blue Cheese Recipe | Fake Food Free
 

The tomatoes are finally on in the garden! We’ve had a few setbacks with sun scorching in the extreme heat, but there has been a steady stream on the kitchen counter for about a week now.

The SunSugar cherry tomato plant is doing well this year. As much as I love these little orange gems, I’ve hit my limit for eating them fresh (at least for a couple days). We needed a little variety.

Over the 4th of July, my aunt sent some Georgia pecans home with us. After my husband got them all cracked open, I had 3 cups of fresh pecans that were screaming to be used.

I love the combination of blue cheese, nuts and honey so that inspired mini-tarts using the cherry tomatoes.

Tomato Tarts Recipe with Honey, Pecans and Blue Cheese | Fake Food Free


The blue cheese was the perfect topper to balance out the sweetness from the nuts, tomatoes and honey. If you don’t like blue cheese, feta, or even parmesan, would work well, too.

Honey-Pecan Tomato Tarts with Blue Cheese

Makes:  6 tarts

What you’ll need:

1 tablespoon extra virgin olive oil
1/3 cup minced onion
2 cloves garlic, minced
1 pint cherry tomatoes
1/3 cup pecans, chopped
1 teaspoon honey
1/2 teaspoon salt
1  9-inch pie crust
3 – 4 oz. blue cheese, crumbled

How to make it:

Preheat the oven to 375 degrees F.

Heat the olive oil in a skillet over medium-high heat. Add the onions and garlic. Cook for 1-2 minutes. Add the cherry tomatoes. Reduce heat to medium and cook, stirring often, about 7 minutes. The tomatoes will begin to burst and the onions will caramelize. Gently smash the tomatoes as they begin to burst.

Stir in the pecans and cook about 1 more minute. Stir in the honey, and the salt. Allow to cool while you prepare the crust.

Roll the pie crust to about 9 inches, and cut into 6 – 3 1/2 to 4 inch circles. I used an x-large muffin pan for the tarts. Place each circle of dough into the muffin tin. Press gently to fill the bottom and to come up about 1 inch on the side. Prick the dough with a fork. (You will likely have a little dough left over.)

Spoon the tomato mixture into each of the muffin tins, filling the crust. Next, divide the blue cheese and sprinkle each tart with an equal amount.

Bake for 20 minutes, until the cheese is melted and begins to bubble, and the edges are browned. Remove from the oven and allow to cool for about 5 minutes before removing from the pan.

Tomato Tarts Recipe with crunchy honey pecans and tangy blue cheese! | Fake Food Free


Thanks for reading! All images and content are the property of Fake Food Free and Lori Rice unless otherwise stated. Please do not republish full recipes and images without written permission. What is okay? Feel free to Pin images, share links to my posts or share the photo in a round up post with the title of this recipe and a link back to the post. Confused about copyright and food blogs? Here is some helpful information on Recipe Attribution. If you want to use a photo or full recipe, just ask. I’m sure we can work something out.

Matcha Tea Cookies with Gooseberry Filling

July 10, 2012

These matcha tea cookies with gooseberry are filled with a tangy spread made of the fruit! The sandwich cookies combine two unexpected flavors that are delicious together!

Matcha Tea Cookies with Gooseberry Filling Recipe | Fake Food Free

The first time I had green tea in sweets was during our trip to Hong Kong a few years ago. We loved the fast-paced, cafeteria-like bakeries we found on almost every corner. During one quick stop, I picked up a green tea cake with red bean filling, and loved it.

Matcha Cake filled with Red Bean from Chinese Bakeries in Hong Kong. The inspiration for match tea cookies with gooseberry filling. | Fake Food Free


If you do a search for matcha green tea there is no shortage of sweets and bakery creations on food blogs. I’m actually a bit late to the party, but for good reason. I had a difficult time finding the powder around here. I tried to find it when I made the Green Tea Bubble Tea last year without success.

Now I know why.

Since my first experience with green tea baked goods was in Hong Kong, I was associating it with the wrong culture (shame on me). When Matcha Factory contacted me to offer a sample, I learned a thing or two, most importantly that matcha green tea is of Japanese origin.

I’d wanted to bake with it for a while so I gladly took them up on the offer. Matcha tea is ground, shade grown, steamed tea leaves. It’s full of antioxidants, and like most other Asian ingredients, it boasts a variety of health benefits. If that isn’t enough, it also turns everything it contacts into a beautiful shade of green. I definitely need more of this in my kitchen.

When it came to bake goods, just about every idea I had for the matcha tea had been done before, and done well. I first set out with the idea of a tea cake. I wanted to use some of this year’s gooseberries sent from my parents.

I posted about gooseberries last year. If you are unfamiliar it is a small round fruit with an internal texture of a blueberry, but a skin more like a grape. They are tart, and great for a something a little different in baked goods.

My cakes are more like a rich, sweet, chewy cookie, and I’m not complaining. The tart gooseberry filling turned out to be perfect for them. 

Matcha Tea Cookies with Gooseberry Filling Recipe on Fake Food Free


Cookies or cakes, I’m sold on adding matcha tea to baked goods. I loved some of the recipes I found on the company’s website such as the Matcha Butter and Matcha Salt. Next up I’m going to use it in a morning shake or maybe a latte.

Matcha Tea Cookies with Gooseberry Filling

Makes: 8 sandwich cookies

What you’ll need for the cookies:
1 1/3 cups Demerara sugar
¾ cup (1 ½ sticks) unsalted butter, melted
1 large egg
½ teaspoon almond extract
1 1/3 cup unbleached all-purpose flour
½ teaspoon baking powder
¼ teaspoon salt
1 teaspoon matcha green tea powder

How to make the cookies:

Preheat the oven to 350 degrees F, and lightly grease a 9 x 13 in baking dish.

In a mixing bowl, whisk together the sugar and melted butter, until combined. Next, whisk in the egg until incorporated and add the almond extract. In a separate bowl, whisk together the flour, baking powder, salt and matcha tea.

Add the dry ingredients to the wet ingredients, and stir until all is combined. You will end up with a thick batter, kind of like a very soft sugar cookie dough.

Matcha tea cookies


Press the batter/dough into the baking dish, and smooth it so that it is evenly spread to the corners.

Bake for 18 – 20 minutes, until the edges begin to brown and the center is set. Remove from the oven and cool completely. 


Gooseberry Filling

What you’ll need for the filling:

1 ½ cups gooseberries, defrosted if frozen
2 tablespoons Demerara sugar
¼ cup water

How to make the filling:

Combine all ingredients in a medium sauce pan and bring to a boil. Once the berries have burst and it begins to thicken, remove from the heat. Allow to cool for about 5 minutes.

Transfer to a small food processor, or you can use an immersion blender in the pan. Blend until smooth and no skins can be found.

Transfer back to the sauce pan and continue to cook over medium to medium-high heat until the filling becomes thick and spreadable. Set aside to cool completely.

Use a round cookie cutter to cut the cooled matcha tea cookies, or cut into squares. You will get about 16 (8 cookies) with a 1 ½ inch cutter. You will get more if you choose to make squares.

To assemble, spread a small amount of the filling on one cookie, and top with another just before serving.

Matcha tea cookies filled with gooseberries recipe | Fake Food Free


Thanks for reading! All images and content are the property of Fake Food Free and Lori Rice unless otherwise stated. Please do not republish full recipes and images without written permission. What is okay? Feel free to Pin images, share links to my posts or share the photo in a round up post with the title of this recipe and a link back to the post. Confused about copyright and food blogs? Here is some helpful information on Recipe Attribution. If you want to use a photo or full recipe, just ask. I’m sure we can work something out.


Disclosure: A free Matcha Tea sample was sent to me by the Matcha Factory. I was not required to post about it and received no compensation for doing so. All thoughts and opinions are my own.

Salad with Grilled Zucchini and Blackberry Balsamic Dressing Recipe

July 7, 2012

Salad with Grilled Zucchini and Blackberry Balsamic Dressing Recipe | Fake Food Free


If you’ve spent any time at all near a summer squash plant, you know how it goes. One minute you see a tiny little zucchini growing; a day later you have a squash as big as your arm.

Those huge zucchinis always went into bread at our house so I made some zucchini muffins last week. Unfortunately, that only used up ½ of the monster.  Instead of more baked goods, I decided to take the rest to the grill for zucchini steaks.

With summer zucchini always comes blackberries so a blackberry dressing sounded perfect. This dressing drizzled on a salad with a couple zucchini steaks and few extras made a great summer meal.

Blackberry Balsamic Dressing Recipe for Salad with Grilled Zucchini | Fake Food Free


Salad with Grilled Zucchini and Blackberry Balsamic Dressing

Makes:  4 servings

What you’ll need:

Zucchini Steaks
8 – 1 ½ inch thick slices zucchini
2 teaspoons olive oil
1 teaspoons balsamic vinegar
Salt and pepper to taste

Blackberry Balsamic Dressing
½ cup blackberries, defrosted if frozen
5 fresh rosemary leaves
2 tablespoons balsamic vinegar
½ cup extra virgin olive oil
1 teaspoons sugar
¼ teaspoons salt
1/8 teaspoons black pepper

Salad
8 cups greens (I used romaine, cabbage and spinach)
4 oz. blue cheese, crumbled
4 tablespoons sunflower seeds

How to make it:

Place the zucchini slices in a shallow dish and drizzle with the olive oil and balsamic vinegar, and sprinkle with salt and pepper. Coat each piece and set aside to marinade while you prepare the dressing and salad.
In a small food processor, combine all of the dressing ingredients and pulse until it is smooth. If using fresh berries you may need to add 1-2 tablespoons of water. Makes about ½ cup of dressing. Set aside.
Prepare four plates with 2 cups of greens, 1 ounce of blue cheese and 1 tablespoon of sunflower seeds. Set aside.

Preheat the grill or a grill pan on the stove. Place the zucchini slices on the grill and cook on medium-high for 3 to 4 minutes on each side.

Place two zucchini steaks on each salad and drizzle with dressing.

Salad with Grilled Zucchini. A great vegetarian summer meal! | Fake Food Free


Thanks for reading! All images and content are the property of Fake Food Free and Lori Rice unless otherwise stated. Please do not republish full recipes and images without written permission. What is okay? Feel free to Pin images, share links to my posts or share the photo in a round up post with the title of this recipe and a link back to the post. Confused about copyright and food blogs? Here is some helpful information on Recipe Attribution. If you want to use a photo or full recipe, just ask. I’m sure we can work something out.


Blue and White Potato Gnocchi with Fresh Red Tomato Sauce Recipe

July 2, 2012

This homemade potato gnocchi with fresh tomato sauce is made with blue and white potatoes for a patriotic 4th of July meal!

Blue and White Potato Gnocchi with Fresh Red Tomato Sauce Recipe | Fake Food Free
 
As I’ve shared before, this year our garden produced an abundance of Adirondack Blue potatoes. I can’t get enough of them! They are such a fun ingredient to experiment with in the kitchen. As you can imagine, with blue potatoes on hand, I thought it appropriate to create some type of patriotic dish for the 4th of July holiday.
 
Yes, I know they look purple, but bear with me here. It has been a long time since I’ve made gnocchi, but that was the first thing that came to mind when I wanted to get creative with the blue potatoes. Paired with the white potatoes my parents brought me from their garden last weekend, and a few surprise tomatoes that arrived in the garden, I had the makings of a red, white and blue creation. Even if the blue potatoes came out a wee bit purple in the end. 
 
Gnocchi is more of a comfort dish; one that doesn’t sound all that appealing in record high temperatures. For that reason, I kept the tomato sauce raw and fresh. The basil gives the dish a refreshing quality that makes it perfectly acceptable for summer.
 
Blue and White Potato Gnocchi with Fresh Red Tomato Sauce Recipe | Fake Food Free
 
 
Blue and White Potato Gnocchi with Fresh Red Tomato Sauce
Makes: 4 to 6 servings
Write a review
Print
Fresh Red Tomato Sauce
  1. 4 medium tomatoes, cored and diced
  2. ¼ large white onion, minced
  3. 20 – 30 fresh basil leaves, chopped
  4. 2 teaspoons balsamic vinegar
  5. 2 tablespoons extra virgin olive oil
  6. 1 teaspoon salt
  7. 2 tablespoons freshly grated Parmesan, plus more for garnish
Potato Gnocchi
  1. 1 lb. blue potatoes, baked
  2. 1 lb. white potatoes, baked
  3. 1 cup unbleached all-purpose flour
  4. 1 teaspoon salt
  5. 1 teaspoon dried parsley
  6. Olive oil
Instructions
  1. Fill a large soup pot with water, about ¾ of the way full. Bring to a boil as you make the tomato sauce.
  2. In a bowl, combine the tomato, onion and basil. Add the balsamic vinegar, olive oil, salt and Parmesan. Toss to mix the ingredients and set aside.
  3. Place the flesh of the white potatoes and the blue potatoes in separate medium-sized bowls. Mash the potatoes until smooth and no clumps are present. Often gnocchi calls for sending the potatoes through a potato ricer. I don't have one, so I do my best to mash the potatoes well with a hand-held masher or a fork. If you have a potato ricer, feel free to use it.
  4. Next, add ½ cup flour to each bowl of potatoes. Then add ½ teaspoon of salt to each, and a ½ teaspoon of parsley. First take the blue potato mixture and combine the flour and potato by hand. Once it holds together, turn out onto the counter and knead as you would bread dough, until a smooth ball is formed.
  5. Roll the potato dough into a thin log. You may need to do this in 2 to 3 batches. Use a knife or dough cutter to cut the log into small ¼ inch pieces. You can leave the pieces as they are, or roll them gently with a fork to create ridges. Place the gnocchi on a plate or baking sheet.
  6. Set aside the blue potato gnocchi and repeat the process with the white potato gnocchi.
  7. Prepare a place for the cooked gnocchi by drizzling about 1 tablespoon of olive oil in a medium-sized bowl.
  8. Once the water comes to a boil, sprinkle in some salt, about a 1/2 teaspoon. Add the blue potato gnocchi to the boiling water in 3 separate batches. Allow it to boil until it floats, about 45 to 60 seconds. Remove from the water with a slotted spoon and place it in the bowl with olive oil. Repeat with the remaining blue potato gnocchi and then the white potato gnocchi. Toss the cooked gnocchi gently in the the olive oil.
  9. Divide the gnocchi into 4 to 6 portions. Top with the fresh tomato sauce, and garnish with freshly grated Parmesan.
Fake Food Free https://www.fakefoodfree.com/


Blue and White Potato Gnocchi with Fresh Red Tomato Sauce Recipe | Fake Food Free


Happy 4th of July to all my readers in the U.S!
 
Thanks for reading! All images and content are the property of Fake Food Free unless otherwise stated. Please do not republish full recipes and images without written permission. What is okay? Feel free to Pin images, share links to my posts or share the photo in a round up post with the title of this recipe and a link back to the post. Confused about copyright and food blogs? Here is some helpful information on Recipe Attribution. If you want to use a photo or full recipe, just ask. I’m sure we can work something out.  

Spicy Sesame Cucumber Salad Recipe

June 30, 2012
Spicy Sesame Cucumber Salad Recipe | Fake Food Free
We planted our cucumbers late this year. The blooms have started and the plants are coming along nicely, but I’m still a bit envious of the mountains of cucumbers I’m seeing from other gardens.
 
Cucumber Bloom | Fake Food Free


I’ve been practicing patience and it was rewarded last weekend when my parents brought me a few from their garden. I’ve wanted to make Wasabi Cucumber Sesame Salad from She Wears Many Hats for a while. But with no wasabi in the house, I had to use it for inspiration and save the recreation for when our cucumbers arrive. 
 
I went with my favorite chili sauce – Sriracha. These cucumbers have just the right amount of heat, but I will warn you, leave them in the fridge a couple days and the fire begins to build!
 

Spicy Sesame Cucumber Salad

Adapted from Wasabi Cucumber Sesame Salad from She Wears Many Hats
 
3 medium pickling cucumbers, thinly sliced
½ tsp salt
1 tbsp Sriracha Chili Sauce
½ tbsp dark sesame oil
2 tbsp white vinegar
1 tsp sugar
Black sesame seeds for garnish
 
Place the thinly sliced cucumbers in a colander and sprinkle with salt. Allow to drain in the sink or over a bowl while you prepare the dressing.
 
In a small dish, whisk together the Sriracha, sesame oil, vinegar and sugar. Transfer the drained cucumbers to a bowl and pour in the dressing. Toss to coat. You can salt and pepper to taste, but I found I didn’t need to add any more salt. Garnish with the black sesame seeds. Serves about 6. 
 
Spicy Sesame Cucumber Salad Recipe | Fake Food Free


Blue Potato Salad with Lemon Basil Vinaigrette Recipe

June 26, 2012
My favorite thing that I’ve grown in our garden is the Adirondack Blue Potato. These potatoes have a pleasant texture, and they add a pop of color to summer side dishes. 
 
Blue Potato Salad with Lemon Basil Vinaigrette Recipe | Fake Food Free
 
In the spring I started a search for a variety of the blue potato. I didn’t want them to eat, but to plant in our garden this year. I finally learned about the Adirondack Blue, but every corner I turned I found that they were sold out.
 
Then I was surprised at Easter by my parents – Adirondack Blue potato seed from Wood Prairie Farm in Maine!
 
So we went from this:
 
Adirondack Blue Potatoes 
 
To this (they look purple on the inside, but they go by the name blue):
 
Adirondack Blue Potatoes before planting
 
 
And then lots of excitement when we saw this:
 
Adirondack Blue Potatoes sprouted in the garden 
 
Followed by this:
 
Adirondack Blue Potatoes bloom before harvest 
 
And this week, we finally got this – almost 15 pounds!
 
Adirondack Blue Potatoes Harvest 
 
 
Adirondack Blue Potatoes 
With blue potatoes on my hands I’m now challenged to come up with a few recipes that show off their beautiful color. We’ll start with a potato salad.
 
The flavor of the blue potato doesn’t really stand out, but they do have a very smooth texture. When cooked until soft (but still firm enough to hold their shape) they are perfect for potato salad.
 
Now the question is – if you put this on your picnic table would people be adventurous enough to eat it?!
 
Blue Potato Salad with Lemon Basil Vinaigrette Recipe. A great summer side dish. 

Blue Potato Salad with Lemon Basil Vinaigrette Recipe

Makes: 6 servings

Ingredients

~ 1 ¾ lbs. blue potatoes
1 small bell pepper, diced (I used a purple lilac pepper)
¼ large onion, chopped fine
Juice of one lemon
1 teaspoon apple cider vinegar
¼ cup olive oil
1 teasppon sugar
~15 fresh basil leaves
Salt and pepper to taste

Preparation

I cook the potatoes using a method taught by my mom. Place the whole potatoes in a pot, cover with water, cover the pot with a lid and bring to a boil. Once they boil, turn off the heat. Leave the lid on, and let them sit in the hot water until the potatoes are softened. For this recipe they sat about 15 – 20 minutes.

Drain the potatoes and let them cool, chop into bite-size pieces. Add the bell pepper and the onion.

In a small bowl, whisk together the lemon juice, vinegar, olive oil and sugar. Chop the basil and stir into the dressing.

Pour the dressing over the potatoes and toss to coat. Salt and pepper to taste.

Refrigerate for about 15 minutes before serving. Serve soon after making because the potatoes do begin to lighten a bit as they sit. 


Thanks for reading! All images and content are the property of Lori Rice and Fake Food Free unless otherwise stated. Please do not republish full recipes and images without written permission. What is okay? Feel free to Pin images, share links to my posts or share the photo with the title of this recipe and a link back to the post. Confused about copyright and food blogs? Here is some helpful information on Recipe Attribution. If you want to use a photo or full recipe, just ask. I’m sure we can work something out.

Beginner Homemade Pasta Making

June 23, 2012

Beginner Homemade Pasta Making | Fake Food Free

The problem with making your own foods is that you regularly discover new things and you realize you can never go back to the package or prepared version. Salsa, guacamole and hummus from scratch beat any store-bought I’ve tried. Homemade corn and flour tortillas will change your world. And making your own pasta results in something that can barely be described in words.

I’d be lying if I said I no longer use dry pasta, but sitting down to a bowl of it does trigger some feelings of disappointment. The texture, flavor and even the look of homemade pasta is worth getting excited over.

I do shy away from making it from time to time because it feels like too much work, but each and every time I follow through, it’s completely worth it.

Ever since I made Hearty Tomato, Kale and Mushroom Sauce I’ve been meaning to do a pasta post. As you can tell, I’m not a step-by-step blogger. This is mostly because I’m not a step-by-step cook. But it’s also because a step-by-step post requires the perfect marriage of a well lit kitchen with the time to stop and photography each step. I rarely have both.

A few weekends ago, I had daylight in the kitchen and the time so I finally documented my pasta making. I was reminded again how much I love this stuff!

Notice that this is a beginner guide. Very, very beginner. I’m still learning, and at times my noodles can be down right ugly. But they still taste good.

      Beginner Homemade Pasta Making | Fake Food Free

 A few tips for your pasta making:
  • Be patient. Dough gets stuck, it stretches out. Try, try again. 
  • If you don’t have an electric pasta attachment, get a helper. I’ve made it with a manual machine by myself before and it’s doable, but tough.
  • Most books will tell you to avoid flouring the dough too much because it makes it gummy after cooking. I try to limit it, but still find I need to flour to keep it from sticking to the table and the machine.
  • Don’t be a perfectionist. Ugly noodles taste good, too. 
  • You don’t have to have a pasta dryer. You can lay the pasta out flat to dry. But I like hanging it on a dryer. 

Pasta dough is simple. Just about every recipe is flour and egg.

 In a food processor, combine:
2 cups unbleached, all-purpose flour
3 large eggs
I’ve used white whole wheat flour as a substitute and it works well, but results in a dryer dough. 
 
Pulse until dough resembles peas, and holds together when pressed between your fingers. You can add a half teaspoon of cold water if it is too dry. Continue to add water until it reaches the above state.
 
Turn the dough out onto a floured surface, and knead until it is smooth, about 2 minutes. Cover in a sheet of plastic wrap or a damp towel and let rest for 15 minutes.
 
Beginner Homemade Pasta Making | Fake Food Free
 

Cut the dough into six equal pieces. Roll those pieces into a ball and flattened into an oval. It’s ready for pressing. 

Beginner Homemade Pasta Making | Fake Food Free
 
Set the pasta maker to the largest setting, meaning the rollers are as wide as they get. 
Slowly turn the crank and feed the dough through. I do this about 3 times on this setting, folding the pasta each time There is no rhyme or reason to my folding. Sometimes I fold end to end, others, horizontally.
 
Beginner Homemade Pasta Making | Fake Food Free
Next, take the pasta maker setting down two notches. This is as far as I go, feel free to make if thinner. Feed the dough through once. You should end up with a long piece of dough that is just a little shorter in width the an the pasta maker rollers.

Beginner Homemade Pasta Making | Fake Food Free
Lay the pasta sheets on a floured surface and cover with a damp towel. Continue the process with the remaining five pieces of dough.

Beginner Homemade Pasta Making | Fake Food Free
The next step is to cut the pasta and this is where help comes in handy. Choose the cut you would like based on your maker. I always make fettuccine. I’ve tried spaghetti, but it got stuck in the maker so I stick with what works.

Beginner Homemade Pasta Making | Fake Food Free
Turn the handle to feed the pasta sheet through the cutter and gently catch and pull the noodles from the other side.

Beginner Homemade Pasta Making | Fake Food Free
Place the noodles on a drying rack. This is where you can pull apart some that stuck together and spread it out evenly to dry.

Beginner Homemade Pasta Making | Fake Food Free
 
Repeat with the remaining sheets.
I know that you can freeze fresh pasta, but every time I make it, it goes straight to the pot. I let it dry for about 15 minutes while the water comes to a boil.
I use a large pasta pot with the inset colander. Bring the water to a boil, salt if it’s your thing, and add the pasta. 
 
Beginner Homemade Pasta Making | Fake Food Free

Don’t stir the pasta right away to keep from breaking it up. After it has cooked about 2 minutes and it’s almost done, I use tongs to separate it a bit and make sure all of it has been sufficiently dunked in the water. The pasta should be done in 3-4 minutes. 

Beginner Homemade Pasta Making | Fake Food Free
 
Drain and serve. Makes about 1 pound to serve 4. 
 
Need more ideas for what to top it with? These are a few of my favorite pasta recipes, and homemade pasta can easily be substituted for any type.
 
Thai Basil Pesto with Cherry Tomatoes and Meatballs
Lemon Feta Shrimp
Bacon and Brussels Sprouts Pasta with Parmesan


Bean Curd and Prawn Stew from Building a Perfect Meal

June 14, 2012
 
 
Bean Curd and Prawn Stew Recipe | Fake Food Free
 
I love when a cookbook has a creative concept, so when I was given the opportunity to review Building a Perfect Meal by Michelle Tchea I knew it was going to be a fun adventure. I might add that when the creative concept is combined with Asian cuisine, well, it doesn’t get much better. 


The cookbook cover reads:
 
“The concept of this cookbook is simple:  start with a basic recipe and then elevate it into something spectacular…”
 
The book starts with a helpful explanation of ingredients including things such as red beans, taro, daikon and luffa. After the knowledge building, the fun begins! Each page has two recipes – the basic recipe to master and then the more complex recipe which incorporates the basic. 
 
For example, Boiled Eggs followed by beautiful Marbled Tea Eggs; Sesame String Bean Salad and then Peanut Summer Noodles; for dessert, Gloriously Sweet Red Beans followed up by Sweet Red Beans and Panna Cotta.
 
There aren’t many cookbooks ideal for both the seasoned cook and the beginner, but this one definitely meets that goal. The best part is that the recipes are straight forward with few ingredients, so if you like quick cooking, this book is for you. 
 
There are many recipes I can’t wait to try, but for my review I went straight to the Bean Curd and Prawn Stew. I was drawn to this recipe both by the flavors and by the beautiful photo (one of many that grace the pages through the entire book).
 
 
Bean Curd and Prawn Stew from Building a Perfect Meal by Michelle Tchea
 
The basic recipe for this dish is Stir-fried Minced Pork. A few more ingredients and the stew is born. This is one of those dishes that surprise you with flavor. Using only sugar and soy sauce for seasoning allows the taste of the other ingredients to shine through.
 

Bean Curd and Prawn Stew 

Reprinted with permission from Michelle Tchea

Serves 2-4
 
Cooking oil for shallow-frying
Onion 1 small, peeled and finely chopped
Prawns (shrimps) 4, peeled and roughly chopped
Minced pork 150 g (5 1/3 oz)
White wine or water (optional) 1 – 2 Tbsp
Diced carrots 45 g (1 ½ oz)
Firm bean curd 100 g (3 ½ oz), cut into small cubes
Dark soy sauce 1 Tbsp
Sugar ½ tsp
Hot water (optional) 1 – 2 Tbsp
Corn flour (cornstarch) 1 tsp, mixed with 2 tsp cold water
Spring onions (scallions) to garnish, finely chopped
 
Heat oil in a wok and lightly sauté onions until fragrant. Add prawns and cook until pink, about 1 minute.
 
Add pork, breaking up any large pieces. Add in a splash of wine or water if the mixture is drying up.
 
Add carrots and continue to cook over medium heat for another 2 minutes or until the meat is just cooked but still moist. 
 
Add bean curd, soy sauce and sugar and cook for another 2 minutes or until heated through. Add a splash of hot water if the mixture is looking dry.
 
Add corn flour mixture and simmer for further 1 minute before removing from heat. Garnish with spring onions and serve hot with rice.
 
Bean Curd and Prawn Stew Recipe


Disclosure: This cookbook was sent to me by Michelle Tchea for review purposes. I was not required to post about it and received no compensation for doing so. Thoughts and opinions here are my own.

Chocolate Covered Marzipan Cookies

June 10, 2012

These marzipan cookies have a chocolate cookie outside made with raw sugars and whole grain flours that surrounds a generous filling of sweet marzipan.

Chocolate Covered Marzipan Cookies | Fake Food Free  

I love marzipan. And I realize every time I say this that I am often alone. 
 
I know far more people who dislike it, than those who are as crazy about it as I am. But I’m convinced there are others out there, or I wouldn’t be able to find it in chocolates and pastries every time we travel to Europe.
 
It all started during our first trip to Vienna, thanks to Mozart. Apparently it was his favorite, too, so anything that contains marzipan there is often called Mozart.
 
My favorite is the Mozart croissant, and while it isn’t exactly the same, I’m happy that I can find almond croissants here with a similar sweet, nutty filling. 
 
My second favorite are Mozart chocolates, or Mozartkugeln. It’s a marzipan filled chocolate or truffle. Some are a little more complex than others with different colors and even additional layers of chocolate inside. 
 
I think about these treats often so on our last trip to the international market, I finally picked up some marzipan. I thought of making croissants, and then chocolates. I finally ended up going a different direction – cookies.
 
Chocolate Covered Marzipan Cookies | Fake Food Free
 
These simple chocolate cookies have marzipan tucked inside. Anyone who loves it will be pleasantly surprised!
 

Chocolate Covered Marzipan Cookies

Makes: 12 large cookies

Ingredients

1 stick (1/2 cup) unsalted butter, softened
1/3 cup mascavo (muscovado) sugar
1/3 cup raw sugar, plus extra for rolling cookies
1 large egg
1 tsp pure vanilla extract
2 tbsp unsweetened cocoa powder
½ tsp baking soda
¼ tsp salt
1 cup + 2 tbsp white whole wheat flour
~3 oz. marzipan 
 
Prep
 
Preheat the oven to 350 degrees F. 
 
Combine the butter, mascavo sugar and 1/3 cup of the Demerara sugar in the bowl of a mixer fit with the paddle attachment. Cream on medium-high for about 2 minutes. Mix in the egg and the vanilla.
 
Next, add in the cocoa powder, baking soda, salt and flour. Mix on medium, just until all ingredients are combined and a cookie dough forms. Scrape the sides of the bowl as needed. Cover the bowl with plastic wrap and refrigerate the dough while you prepare the marzipan.
 
Divide the marzipan into 12 pieces and roll each into a small ball. Divide the cookie dough into 12 portions and surround each piece of marzipan with cookie dough. Roll the cookie in raw sugar. 
 
Place the cookies on an ungreased baking sheet and flatten slightly. Bake for 10 minutes, remove from the oven, cool for a couple minutes and transfer to a rack to cool completely. 
 
Chocolate Covered Marzipan Cookies | Fake Food Free
 
 Thanks for reading! All images and content are the property of Fake Food Free unless otherwise stated. Please do not republish full recipes and images without written permission. What is okay? Feel free to Pin images, share links to my posts or share the photo in a round up post with the title of this recipe and a link back to the post. Confused about copyright and food blogs? Here is some helpful information on Recipe Attribution. If you want to use a photo or full recipe, just ask. I’m sure we can work something out. 
Want to create beautiful food and product photos that you can't wait to share?!
Discover your style, control the light, and shoot using the tool you know how to use (yes, your phone included). Learn about free resources, Live Q&As with Lori, and online courses you can take from anywhere in the world!
We respect your privacy. Unsubscribe at any time.