Archives

Baked Eggs with Pumpkin and Greens Recipe

October 16, 2012

I love eggs just about any way you can make them. No problems with the taste or texture here, I could eat them at every meal. Over the years my tastes have evolved from scrambled and hard boiled only, to fried, and just recently to poached with rich, runny yolks.

I realized recently that one of the only ways I have yet to make eggs is baking them. It had to be easier than poaching, right?

I had some left over pumpkin puree from roasting a pie pumpkin last week, and my mom brought me some kale from their garden this past weekend. I mixed in a few other ingredients and made this the base for eggs.

No surprise – I now love baked eggs too!

Even if eggs aren’t your thing, this combination makes a great baked side dish. I used kale and bok choy, but any hearty green will work fine

 Baked Eggs with Pumpkin and Greens Recipe

1 tbsp olive oil
1 small onion, sliced
2 cloves garlic, minced
2 cups chopped kale
2 cups chopped bok choy (mostly greens)
1 cup pumpkin puree
1 cup ricotta cheese
1/2 tsp salt
1/4 tsp black pepper
4 eggs
1 tbsp panko bread crumbs (optional)

Preheat the oven to 375 F and lightly grease a small casserole dish with olive oil.

Heat the 1 tablespoon of olive oil in a skillet over medium-high and add the onion and garlic. Cook for 2 minutes, or just until the onions begin to soften. Add the greens and cook only 60-90 seconds, just until the greens begin to wilt. Remove the skillet from the heat.

Stir in the pumpkin, ricotta cheese, salt and pepper. Transfer the mixture to the casserole dish.

Make four small indentations in the pumpkin mixture. One at a time, crack the eggs into the wells you created. Sprinkle the top evenly with the bread crumbs.

Bake for about 20 minutes, or until the whites are set, but the yolks are soft. Less if you like runny yolks, more if you like your eggs firm. Remove from the oven and serve warm. Makes 4 servings.

Pumpkin Peanut Butter Cookies Recipe

October 10, 2012

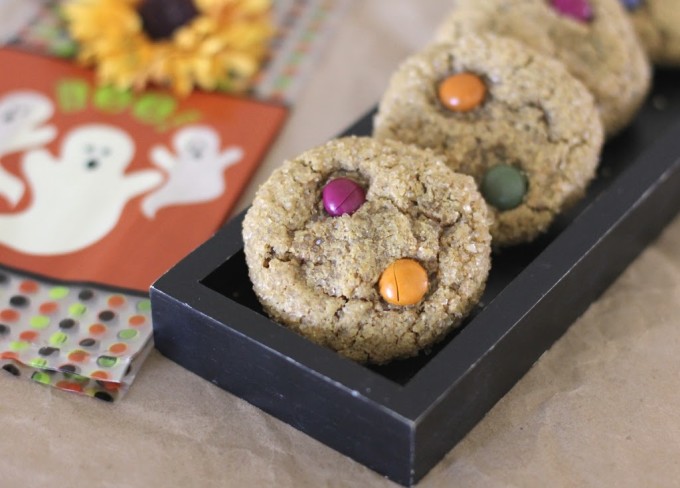
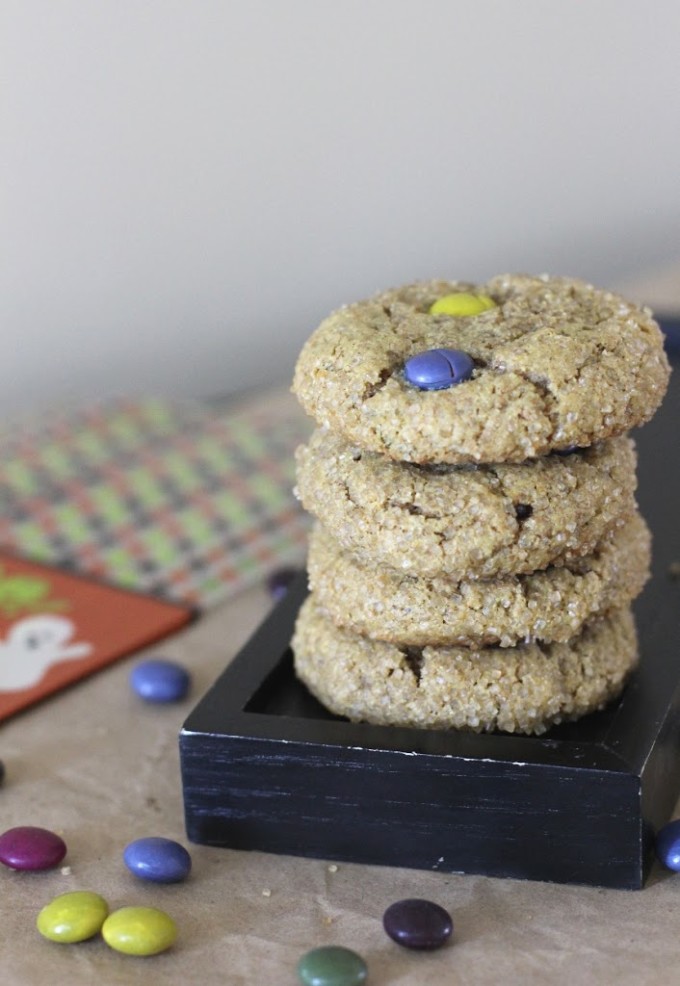
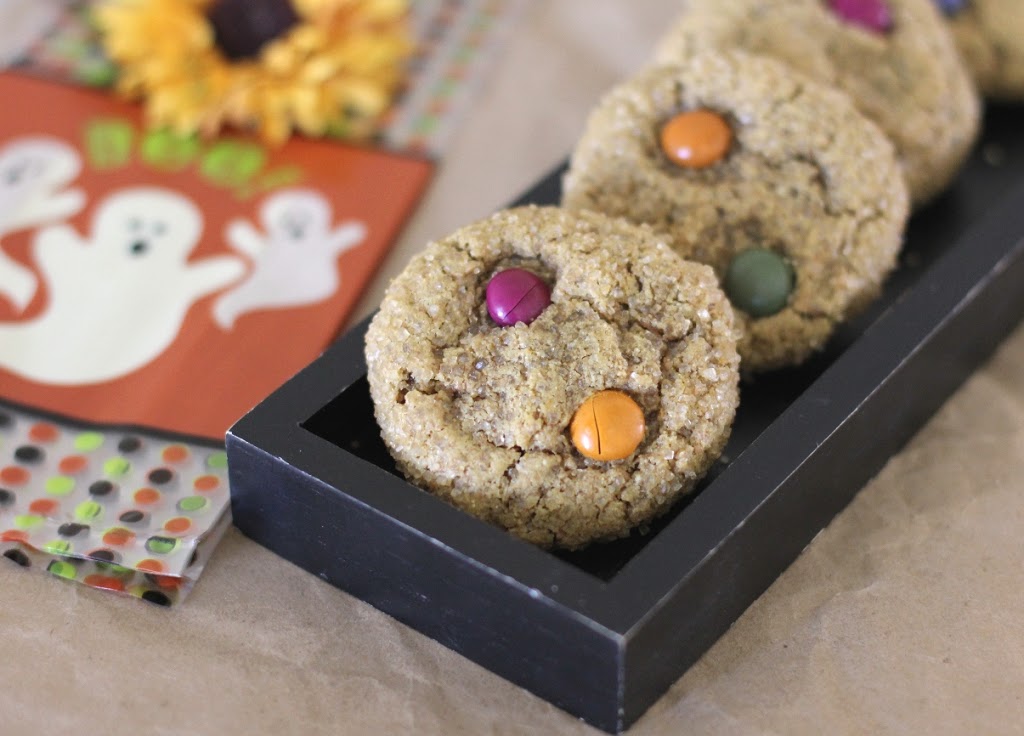
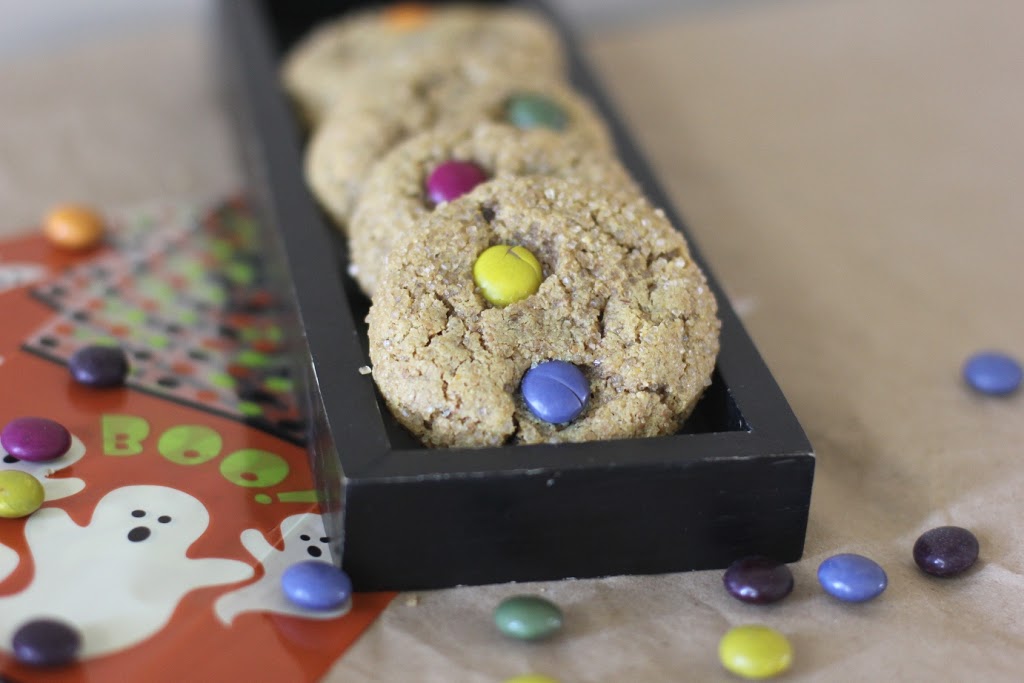
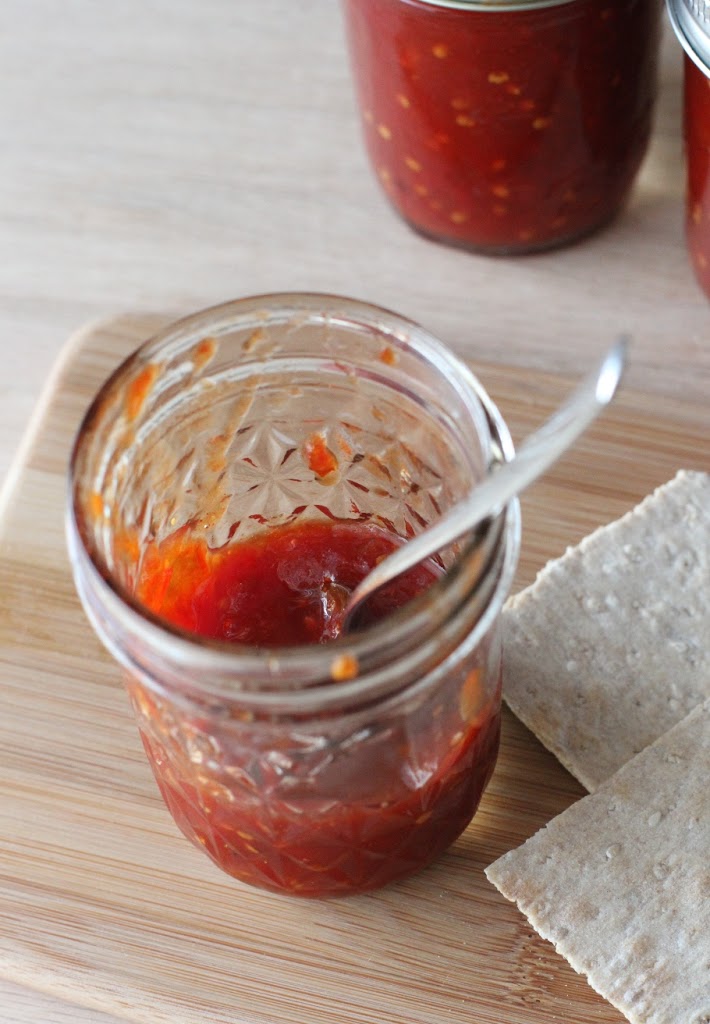
These pumpkin peanut butter cookies are one of my favorite cookies for the fall! They are chewy and full of pumpkin and peanut butter flavor! When I first made these a few years ago, I used UNREAL Chocolates that were sent to me for review, but you can easily substitute your favorite chocolate candies or simply use chocolate chips.

Pumpkin Peanut Butter Cookies Recipe | Fake Food Free

A couple of months ago I participated in a Twitter tasting party. Yeah, I didn’t know what it was either. I quickly learned that at a Twitter tasting everyone tries samples of a food while they tweet about the products with a group of like-minded folks. I’m not going to lie. It was a lot of fun!
 
This tasting happened to be for UNREAL™ candy through Kitchen Play. I hadn’t heard of this candy before, and I quickly became intrigued by the information that was sent my way. 
 
First, let me start out by saying – candy is candy. It’s not something any of us should be consuming in mass amounts, but there is a reason I welcomed trying out UNREAL products. This candy is proof that you can still enjoy a treat that isn’t loaded with HFCS, artificial colors and preservatives.  I was even more impressed to learn that the dairy for their chocolate comes from pastured cows and the colorings for the candies are from plant sources such as beets and red cabbage. 

After the Twitter tasting, I thought I might try using the candies in some baking for Halloween. I have to admit that I since we’ve cut out the majority of processed foods from our diet, I do miss using candies in making creative cookies and cakes. That’s not to say I don’t have a peanut butter cup on occasion, but I’m just not comfortable promoting a recipe that uses these things, moderation or not.
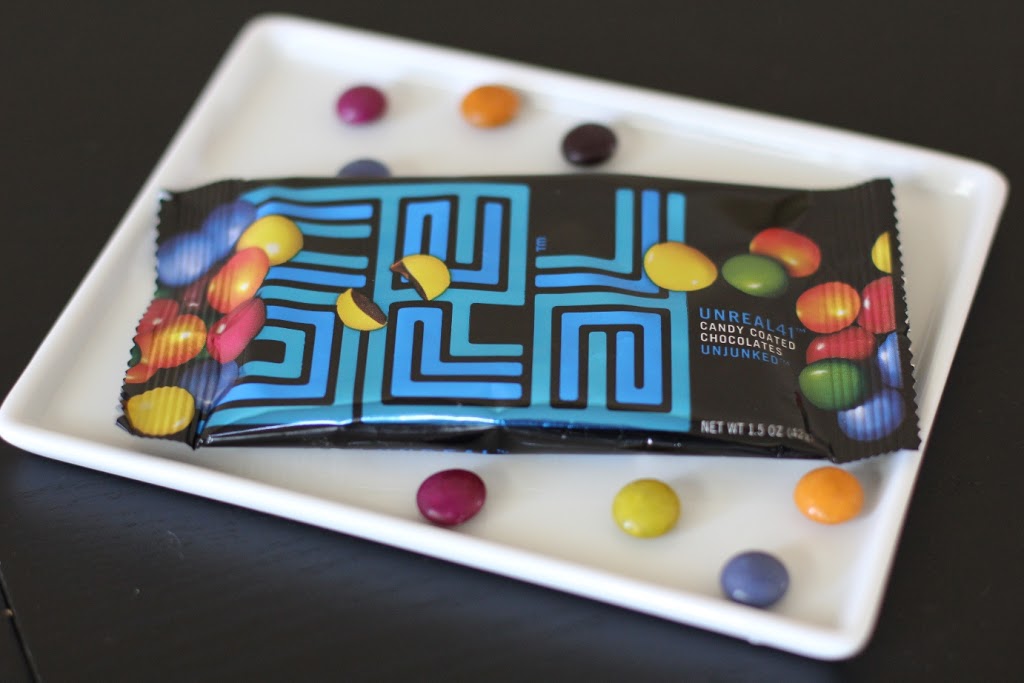
UNREAL sent me a few more bags of their candy coated chocolates (UNREAL 41 and 54) so I could try out a new recipe. (I love the colors of these chocolates. With the plum, dark green and yellows they are the perfect color profile for fall.) 

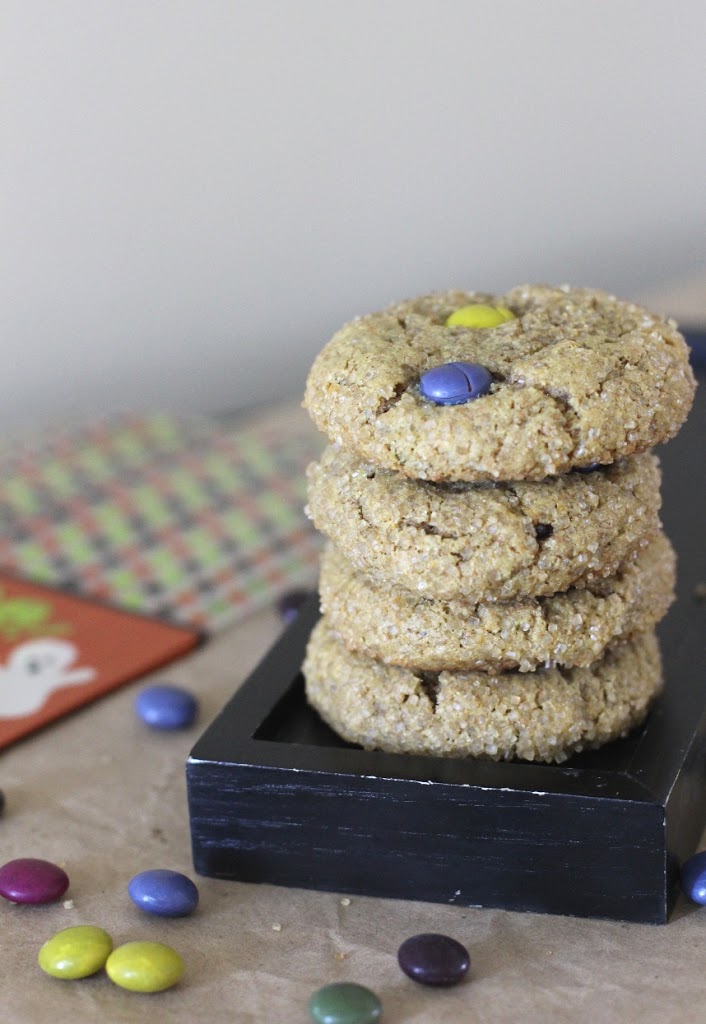
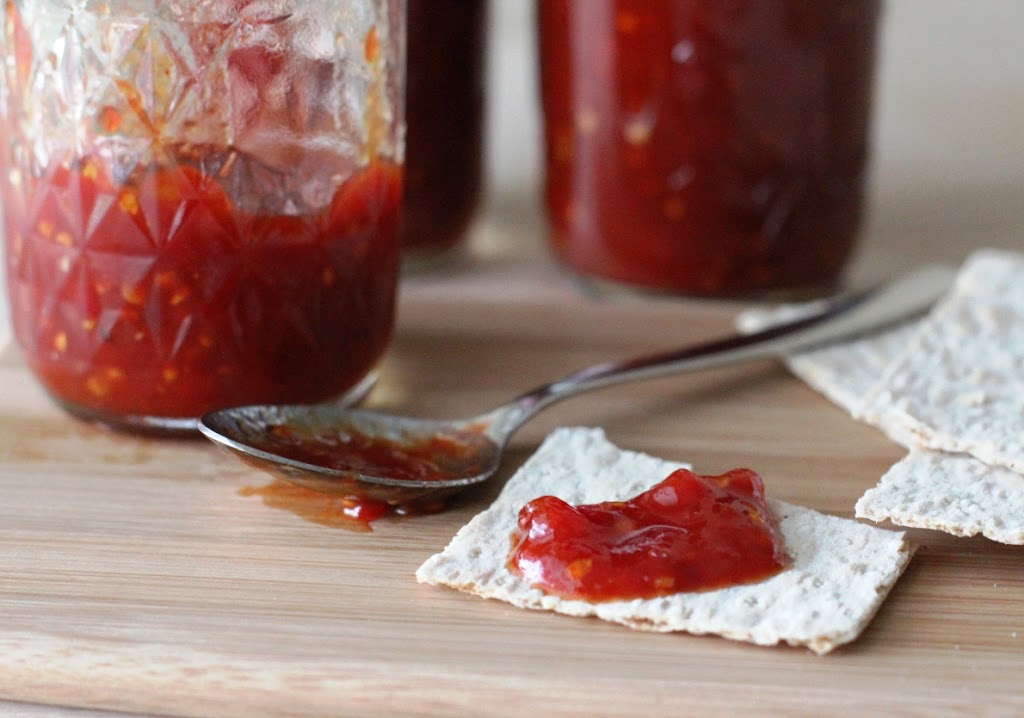
I set out to make some whole wheat peanut butter cookies, and then added some pumpkin. This took the place of some of the butter, and made the cookies even more ideal for autumn. The chocolates baked up beautifully in the cookies. The result was a soft cookie with bites of rich chocolate that went well with the peanut butter and hint of pumpkin. 

Pumpkin Peanut Butter Cookies Recipe | Fake Food Free
Pumpkin Peanut Butter Cookies Recipe
Makes: 18 to 20 cookies
Write a review
Print
Ingredients
  1. ½ cup Demerara sugar (or raw sugar), plus extra for rolling cookies
  2. ½ cup mascavo (muscovado) sugar
  3. 4 tablespoon unsalted butter, softened
  4. ½ cup natural peanut butter (unsweetened, but salted)
  5. ¼ cup pumpkin puree (mine was from a fresh roasted pumpkin)
  6. 1 large egg
  7. ¼ teaspoon pure vanilla extract
  8. 1 ½ cups whole wheat flour
  9. ¾ teaspoon baking soda
  10. ½ teaspoon baking powder
  11. ¼ teaspoon fine ground sea salt
  12. 2 to 3 1.5-oz packages of UNREAL™ 41 Candy Coated Chocolates
Instructions
  1. Preheat the oven to 350 degrees F.
  2. In a mixer fitted with the paddle attachment, beat the sugars, butter and peanut butter for about 2 minutes on medium-high. Add the pumpkin, and blend in the egg with the mixer on low. Add the vanilla.
  3. In a separate bowl, whisk together the flour, baking soda, baking powder and salt. Slowly add the dry ingredients to the mixing bowl. Mix on low just until all ingredients are combined.
  4. Stir in the candy coated chocolate being careful not to break up the chocolates too much.
  5. Spoon out a generous 1 tablespoon of cookie dough and roll into a ball. Roll the ball in raw sugar. (You don’t have to roll the cookies in sugar, but it adds a nice crunch to the baked cookie.)
  6. Place on an ungreased cookie sheet and slightly flatten the cookies with your hands. Bake for 8-10 minutes, until the cookies are firm and the edges are browned. Allow to rest on the cookie sheet for about 1 minute and then transfer to a cooling rack.
Fake Food Free https://www.fakefoodfree.com/


Pumpkin Peanut Butter Cookies Recipe | Fake Food Free


********************************
 
Just about everyone I’ve mentioned this candy to is as intrigued as I was about the source and ingredients. If you have any questions, fire away in the comments. I think these candies are a great option for Halloween. You’ll find more product information below.
 
 
UNREAL candies contain:
No corn syrup, hydrogenated oil, artificial flavor, GMO’s or synthetic colors.
Responsibly sourced ingredients, including:
Traceable cacao beans from Ghana and Ecuador
100% sustainable and organic Palm Kernel Oil sourced from a sustainable and organic plantation in Brazil
Dairy from free-range cows pasture raised without antibiotics or added hormones
All natural origin colors, coming from plants like beets, red cabbage, etc.
30% less sugar, 60% more protein and 250% more fiber
 
UNREAL candies are offered at the same price as typical candy bars.  Available at major retailers, nationwide, including CVS, Kroger, Staples, BJ’s Wholesale Clubs and many others, UNREAL prices range from $.89 to $1.29 for individual bars and $4.99 for the family sized bags 
 
Disclosure:  The candies used in this recipe were sent to me free of charge from UNREAL. I was not required to post about them and received no compensation for doing so. Thoughts and opinions on the product are my own.
 
Thanks for reading! All images and content are the property of Fake Food Free unless otherwise stated. Please do not republish full recipes and images without written permission. What is okay? Feel free to Pin images, share links to my posts or share the photo in a round up post with the title of this recipe and a link back to the post. Confused about copyright and food blogs? Here is some helpful information on Recipe Attribution. If you want to use a photo or full recipe, just ask. I’m sure we can work something out.  


Lettuce Wraps with Pork, Apple and Tamarind Recipe

October 6, 2012


I hate to be that person. The one who squeezes produce before they by it. I minded my manners on my last visit to the Farmer’s Market, and simply selected my basket of apples by sight alone. Big mistake. I grabbed one for a snack on the drive home only to find that it was soft, along with the rest in the basket.

You should know something about me and soft apples. I can’t stand them. If the first bite isn’t so crisp that it pops, I can’t even finish it. I know, I know. It’s a bit dramatic, but it’s the truth.

So this whole recipe started with soft apples. Since the basket I bought wouldn’t be good for eating fresh (by my standards) I had to find some more creative ways to use them.

The apples led me to a sweet and savory ground pork dish, which then led me to having it over rice, which then led me to wrapping it up in a lettuce leaf. I’m not quite sure why I don’t make lettuce wraps more often. I need to move them up the list of my go-to dishes.

I used sticky rice for this version, but any type of rice will work. Or you can use rice noodles, or leave it out all together.

Lettuce Wraps with Pork, Apple and Tamarind Recipe

~ 1 lb ground pastured pork
1 medium onion, chopped
3 cloves garlic, minced
1 apple, cored and diced
1 tsp tamarind concentrate
1 tbsp tamari or soy sauce
1 tsp fresh ginger, grated
1/4 tsp crushed red pepper
4 green onions, sliced (for garnish)
1 to 1 1/2 cups cooked sticky rice
1 head romaine lettuce

In a heavy skillet, brown the pork over medium-high heat. Break it up into small pieces as it cooks. After 2-3 minutes, add the onion, garlic and apple. Continue to cook until the pork is fully browned and no longer pink. Drain any excess grease, if necessary.

Add the tamarind, tamari, ginger and crushed red pepper. Sprinkle on some of the green onions.

Prepare about 3 lettuce leaves for each person. Top each leave with a portion of rice, and then the pork. Garish with any remaining onions. Serves about 4.

Spiced Gooseberry Oat Bars Recipe

September 29, 2012

A few weeks ago, a slight freezer malfunction caused a hiccup in my food storage. All is good now, but there were a few things that managed to completely thaw before I was able to catch them. One of these was the gooseberries that my parents had given me earlier in the summer. 
I spent a few days staring at them in the fridge, and then decided that baking was the only answer. (I’ve learned that baking is the answer to a lot of things. I recommend trying it the next time you have a problem.)
I decided that these tart little berries would go great in my favorite oat bars. Since this gave me the opportunity to make the recipe again, I decided I’d experiment with a few other ingredients as well.
I made this batch with virgin coconut oil, which worked great. Keep in mind that this makes them a delicate, crumbly bar; one you will want to eat with a fork and not pack in your snack bag. I also had some gluten-free flour. Since this is a recipe that doesn’t need to rise, I felt it was safe to substitute all the white whole wheat flour for the gluten-free mix. Another winner. (Although, as you probably know if you eat gluten-free, oats are a tricky food. So I won’t be quick to name these 100% gluten-free.  But you can easily make yours that way, if you need it.) 
With fall finally arriving, I decided to spice this batch up a bit with ginger, nutmeg and cinnamon. I loved the way the flavors went with the tart berries. If you can’t get your hands on gooseberries, almost any berry will work. Cranberries and blueberries have been two of my past favorites. 

Spiced Gooseberry Oat Bars Recipe

Adapted from Blueberry Oat Bars, Bryant’s Blueberries

1 ¾ old fashioned rolled oats
1 ½ cups flour (I used Bob’s Red Mill Gluten-free All Purpose Baking Flour in this batch)
¾ cup mascavo (muscovado) sugar (or brown sugar)
½ cup chopped walnuts
½ tsp baking soda
1 tsp salt
¼ tsp ground ginger
½ tsp ground nutmeg
1 tsp ground cinnamon
¾ cup melted virgin coconut oil

2 cups thawed gooseberries
¾ cup raw sugar
1 tbsp cornstarch or arrow root
2 tbsp water
1 tbsp lemon juice

Preheat the oven to 350 degrees F.  Grease a 9 x 13 inch baking dish with coconut oil. 

In a medium bowl combine the oats, flour, mascavo sugar, walnuts, baking soda and salt. Add the ginger, nutmeg and cinnamon. Pour in the melted coconut oil and stir to mix well. You should have a crumbly mixture that is wet enough to hold when pressed together. Reserve about ¾ cup of the mixture. 

Press the remaining oat mixture into the baking dish. Spread it evenly and press it firmly into the pan. Bake for 10 minutes. Remove from the oven and set aside. 

In a sauce pan combine the gooseberries, and raw sugar (you can add more or less sugar to your taste). Bring to a boil, then simmer, for about 2 minutes. Stir to break up the berries. 

In a small dish, stir together the cornstarch, water, and lemon juice to make a paste. Add the paste to the gooseberries and stir until the fruit is thickened. Remove from heat.

Spread the fruit over the oat crust leaving just about a ¼ inch edge on all sides. Crumble the reserved topping evenly over the fruit. Bake for 18 to 20 minutes or until the edges of the crust begin to brown. Cool the pan on a wire rack. 

Once cooled completely, cut into bars. Makes about 15 bars.

Smoky Tomato Jam

September 25, 2012

Smoky tomato jam recipe | FakeFoodFree.com

 
You will never hear me use the word guilt in association with food and eating. Personally, I think it is a damaging word that has shaped our thoughts on eating habits, weight and health for far too long. 
 
That being said, I have one exception. 
 
The garden.
 
When this time of year rolls around and I see hot peppers so heavy on the plant that they touch the ground, and tomatoes that are ripe, but a little ugly, I start to feel guilty. It’s food, I can’t let it go to waste! And while I’m exhausted from thinking of ways to use it, I just can’t leave it out there to rot, or pull up the plants knowing they have some life left in them.
 
So with a full freezer, I turned to a little more canning this past week. 
 
First up? Tomato jam. 
 
I’d been entertaining the idea of making tomato jam, most of the summer, but never committed. Then I found a recipe from Food in Jars for Orange Tomato Jam with Smoked Paprika.  It was the smoked paprika that got me. I love that stuff!
 
Smoky Tomato Jam Recipe for summer | FakeFoodFree.com
 
 
So I gathered up the last of the tomatoes, and got cooking. Our orange tomato plants are done producing, but I still had Better Boy and San Marzano hanging on. They worked perfectly. I also used dried ginger (half the amount) instead of fresh, and skipped the cayenne simply because I didn’t have any dried on hand. 
 
You can find the recipe on the Food in Jars blog. This jam is the perfect balance of sweet, spicy and smoky. Next year, I will be pulling this recipe out early to get a head start during prime tomato season. Yes, it’s that good.
 
 
Smoky Tomato Jam Recipe | FakeFoodFree.com

Kentucky Road Trip: Natural Bridge State Park and Red River Rockhouse

September 22, 2012
 
During the summer of 2012, my husband and I made it a point to visit a few places around central Kentucky that were new to us, or that we have put off year after year. One place I reviewed a few weeks ago, The Bluebird, is a wonderful restaurant serving local foods in the small town of Stanford, Kentucky.
Our next stop included food, but some activity too. Kentucky is pretty well-known in the world of rock climbing for Red River Gorge, an area located in south eastern Kentucky, only about 45 minutes from Lexington. Nearby is Natural Bridge State Park, surrounded by Daniel Boone National Forest. For those of us who aren’t rock climbers, this may be a better fit. 
Walk up to the Natural Bridge
 
The natural bridge is just that – a natural sandstone bridge that arches  65 ft above the ground. The area is beautiful, and a nice place to spend the day hiking especially in late summer or early autumn. 
View of the bridge


Walking across the Natural Bridge

View from on top of the Natural Bridge
After a day of activity, you’ll likely be hungry. Until recently, pickings were limited. You could eat the traditional Kentucky buffet at the resort park, or there is always Miguel’s, the pizza place very popular among rock climbers. 
A few months ago, I had the pleasure of meeting the owner of a new place that opened up in the area. In fact, they are celebrating their one-year anniversary this weekend. I had promised to visit soon, so we knew what our lunch would be on this trip. 

The Red River Rockhouse is a cool little burger joint that has the charm of a quaint coffee shop. They source their meats from local farms, and they offer plenty of vegetarian and vegan options. And because they are located just across the county line, they also serve beer. 


Now, I have to be completely honest. If you are not a rock climber, you will be an outsider. That’s not to say that everyone isn’t incredibly friendly. They are. But you will likely get a few stares as you pull up to the parking lot. That is something I wasn’t expecting the first time I went to the other eating option in the area, Miguel’s. Rockhouse did seem to be a little more diverse with more locals as well as traveling climbers, but there is no doubt that I have – I’m not a climber – written all over me. But hey, when good food is involved, I step out of my comfort zone. 
We got there early so they needed to change the breakfast menu over to lunch, but we were still able to get a burger. A good burger too, with grass-fed beef from a Clark County farm. Unlike just about everyone I know, I don’t like thick burgers. I like thin, griddle style burgers that have crispy edges. It’s difficult to get a grass-fed burger like this, but if you like them too, then the Rockhouse is the place for you.
We left happy, full, and exhausted. (I think my exhaustion had a little bit to do with my 2 hour adrenaline rush due to my fear of snakes, but that is a story for another time. The burger got my mind off of it.) 
If you find yourself enjoying some of Kentucky’s gorgeous parks soon, be sure to seek out the Rockhouse. Oh, and a tip for finding it – just keep driving. The sign will jump out at you at the last minute, and you’ll have to turn around and go back. But that’s part of the fun in driving in rural Kentucky. Enjoy! 
Red River Rockhouse
4000 KY Route 11
Campton, KY 41301
http://redriverrockhouse.com/
Find them on Facebook

Homemade Garden Chili Slow Cooker Recipe

September 19, 2012


Chili is one of those foods that I get burned out on by December, but every time the next September rolls around, I’m ready for it all over again. My cravings for it this year started this past week, and they are just about spot on, considering we are moving towards the end of the month.

As you can probably tell from my posts, it has been a great garden year. We are still bringing in more tomatoes than I know what to do with, and I have plenty of frozen veggies from harvests earlier in the summer. With the weather turning cooler here, chili seemed like the ideal way to use them up.
My goal was to use a lot of fresh tomatoes, so this recipe does take some prep work. For me, this is just the kind of thing I enjoy doing on a quiet Sunday. Once it’s all in the slow cooker, it’s low maintenance from there on out. 
Feel free to substitute different kinds of vegetables. I’ve been shredding and freezing zucchini all summer, and we also had some sweet corn tucked away in the freezer. Both ended up being a great addition to this chili.

Homemade Garden Chili Slow Cooker Recipe

6 – 8 lbs of tomatoes (you’ll need about 6 cups of sauce)
5 cloves garlic
1 small onion, chopped
2 cups black beans, soaked overnight
2 cups shredded zucchini, thawed if frozen
1 cup sweet corn, thawed if frozen
1 cup water
2 tbsp chili powder
1 tsp chipotle chili powder
1 tsp cumin
2 tsp salt
½ tsp ground black pepper
2 scotch bonnet peppers (or your favorite hot pepper)
Preheat the oven to 400 degrees F. Cut de-stem and core tomatoes if necessary, and cut in half. (I used a mix of San Marzano, Beefsteak and heirlooms.) Arrange cut side down on a baking sheet with the garlic and drizzle with a little olive oil. In batches, roast for 20 minutes. Set aside to cool.
Add the onion and black beans to your slow cooker. Remove the skins from the tomatoes and place the pulp and the garlic cloves in a blender. Blend in batches until a smooth sauce results. Pour the sauce into the slow cooker. Set to high.
Add the zucchini and corn. Add the water. Stir in the chili powders, cumin, salt and black pepper.  Take the scotch bonnet peppers and de-stem them. Cut a small slit in the side of each. Place the whole pepper in the soup. Put on the lid and cook on high for about 4 1/2 hours, or until the beans are tender.
Before serving, remove the two peppers and discard. Serve with your favorite toppings. Makes about 6 servings.

Roasted Eggplant and Black Lentil Soup Recipe

September 16, 2012

This eggplant and black lentil soup recipe is one I came up with after a Kentucky Food Bloggers event at Whole Foods. I’ve used black lentils a lot more since then, but this recipe still remains a favorite for cool summer days and for transitioning into autumn. It’s thickened with eggplant puree and flavored with tahini and garam masala. 

Roasted Eggplant and Black Lentil Soup Recipe | Fake Food Free
 
It’s hard to believe that it has been almost a year since our Kentucky Food Blogger group got together. We attempted all spring and summer, but busy schedules wouldn’t allow us to find a date that would work for more than a couple people.
 
That changed this past Friday night with the help of Whole Foods Market in Lexington. We were invited out to attend a special edition of their Flights After 5 event. Flights After 5 is a Friday night get-together where 5 beer tastings are matched with 5 appetizers at stations throughout the store. Last Friday Kentucky beers were featured including two of my favorite breweries West Sixth and Lore Brewing.


Several area bloggers joined the staff at Whole Foods as they told us a bit about the work that they do, and about the mission of the store. I will admit that I’m not a 100% Whole Foods shopper, but I do appreciate the products I buy there – grains from the bulk bins, my puffed kamut, and Ataulfo mangos, when they are in season.
 
I really like that on their website you can find Unacceptable Ingredients for Food and their Meat Animal Welfare Standards. That makes shopping easy. Through my work in agriculture, I’ve come across many local meat producers and fruit and vegetable farmers who supply Whole Foods. The combination of local support and global projects makes me a fan. We also learned that they price match with surrounding competitors, which explains why I’ve always felt that many things at Whole Foods aren’t any more expensive than they are at other area supermarkets.
 
Along with a little education, good beer and snacks, and great company, we received every food bloggers favorite thing – a goodie bag! They kept our cooking in mind and filled it with several ingredients, perfect for putting together a few new recipes. I was happy to see black lentils in my bag. I’ve used their brand before, and I was excited to create something new with them.
 
 
Baba ganoush was one of the appetizer offerings that night so I had eggplant on my mind. Lucky me, we just happen to still have eggplant from the garden.
 
I had no idea what direction I would go with the soup, but the more I tasted it, the more I felt it needed some Indian influences, which ended up making it a lot like daal. (And I’m definitely not complaining.) Tahini and garam masala came to the rescue, and I added some crushed red pepper for heat. It turned out to be a great way to celebrate the start of comfort soup season!
 
Roasted Eggplant and Black Lentil Soup Recipe | Fake Food Free


Roasted Eggplant and Black Lentil Soup Recipe  
Makes: 4 to 6 servings
Write a review
Print
Ingredients
  1. 6 small eggplants (you need about 1 cup roasted pulp)
  2. 1 1/2 tablespoons extra virgin olive oil
  3. 1 small onion, chopped
  4. 2 cloves garlic, minced
  5. 4-6 cups vegetable stock
  6. 2 tablespoons tahini
  7. 1 cup black lentils
  8. 1 teaspoon salt
  9. 1 teaspoon garam masala powder
  10. ¼ teaspoon ground black pepper
  11. ¼ teaspoon crushed red pepper
Instructions
  1. Preheat the oven to 400 degrees F.
  2. If your eggplant is round, de-stem and cut each in half. Longer Japanese style can be roasted whole. Lightly coat the eggplants with 1/2 tablespoons of the olive oil and spread in an even layer, cut side down, on a baking sheet. Bake for 20 minutes, or until pulp is very soft. Remove from the oven and allow to cool.
  3. In a soup pot, heat the 1 tablespoon of olive oil over medium-high and add the onion and garlic. Cook over medium to medium-high until the onions begin to soften, about 3 minutes. Add 4 cups of the stock. (Reserve the remaining 2 cups to add later, if you want a thinner soup.) Simmer for about 3 minutes.
  4. Scoop out the cooled eggplant pulp and transfer it to the soup pot. Use an immersion blender to blend the eggplant, onions and garlic with the stock until smooth.
  5. Add the tahini, and bring the soup to a low boil. Stir in the lentils. Reduce heat and simmer for 20 minutes or until the lentils are tender. Add the salt, garam masala, black pepper and crushed red pepper. Add more or less of each to taste. Simmer for another minute or two and serve.
Fake Food Free https://www.fakefoodfree.com/


—————————————————————————-

Voting for the Country Living Blue Ribbon Blogger Awards ends September 17, 2012! Fake Food Free is a finalist! If you enjoy my blog, I’d truly appreciate your vote for Reader’s Choice. You can vote here, no sign in or registration required.

Disclosure:  Some products in this recipe were given to me free of charge from Whole Foods Market. I was not required to post about them and received no compensation for doing so. Thoughts here are my own. 


Thanks for reading! All images and content are the property of Fake Food Free unless otherwise stated. Please do not republish full recipes and images without written permission. What is okay? Feel free to Pin images, share links to my posts or share the photo in a round up post with the title of this recipe and a link back to the post. Confused about copyright and food blogs? Here is some helpful information on Recipe Attribution. If you want to use a photo or full recipe, just ask. I’m sure we can work something out.  

Black Sesame Granola Recipe

September 12, 2012
Black Sesame Granola Recipe made with dried fruit, nuts and tahini | FakeFoodFree.com #granolarecipes #healthyrecipes #healthyeating #breakfast
 

The first signs of autumn are in the air and that means oatmeal has returned to the breakfast scene around here. I eat it almost every day, but as much as I love a warm bowl on a cool morning, everyone needs a little variety. That’s where granola comes in.

I’ve made Coconut Lime Granola and Cranberry Pumpkin Granola, but this batch had a purpose – to use up some specific ingredients in the pantry.

First up are black sesame seeds, followed by tahini. I love them both, but when most recipes call for only 1 to 2 tablespoons, it takes a while to use them up.

Both ingredients give this granola a nutty, salty flavor. If you like yours a bit sweeter you can add more honey or some extra dried fruit. I used dried cranberries and unsalted peanuts in this version, but any fruit and nut combo would work well.

Black Sesame Granola Recipe

Ingredients
1/4 cup virgin coconut oil, melted
1/3 cup raw honey
2 tablespoon tahini
4 cups old-fashioned rolled oats
1/4 cup unsalted sunflower seeds
1/4 cup black sesame seeds
1/4 cup dried fruit (I used cranberries)
1/4 cup nuts (I used unsalted peanuts)
1/8 teaspoon fine sea salt

Preparation
Preheat the oven to 375 degrees F.

Whisk together the oil, honey, and tahini in a large bowl. Stir in the oats.

Add the remaining ingredients and stir to coat well. Pour out onto a baking sheet sprayed with coconut oil and spread evenly.

Bake for 30 to 40 minutes, stirring every 10 minutes. Makes about 5 cups.

 
Black Sesame Granola Recipe | FakeFoodFree.com #granolarecipes #healthyrecipes #healthyeating #breakfast


—————————————————————–

Voting for the Country Living Blue Ribbon Blogger Awards is open until September 17! Fake Food Free is a finalist! If you enjoy my blog, I’d truly appreciate your vote for Reader’s Choice. You can vote here, no sign in or registration required. 


Roasted Corn Salad and Gardening at Gastronomical Sovereignty

September 10, 2012

It wasn’t my intention to take such a long break from the blog. I’ve been traveling, and posts (and internet access) didn’t go as planned. I’m back, though, and ready to get in the kitchen! I also have a few delicious meals to share with you from our 2,500 mile cross-country trip.

Today you will find me over at Gastronomical Sovereignty talking about gardening and sharing my favorite roasted corn and pepper salad with wheat berries!

Come say hi, and check out Kristy’s great blog while you are at it!

Want to create beautiful food and product photos that you can't wait to share?!
Discover your style, control the light, and shoot using the tool you know how to use (yes, your phone included). Learn about free resources, Live Q&As with Lori, and online courses you can take from anywhere in the world!
We respect your privacy. Unsubscribe at any time.